Nov
12
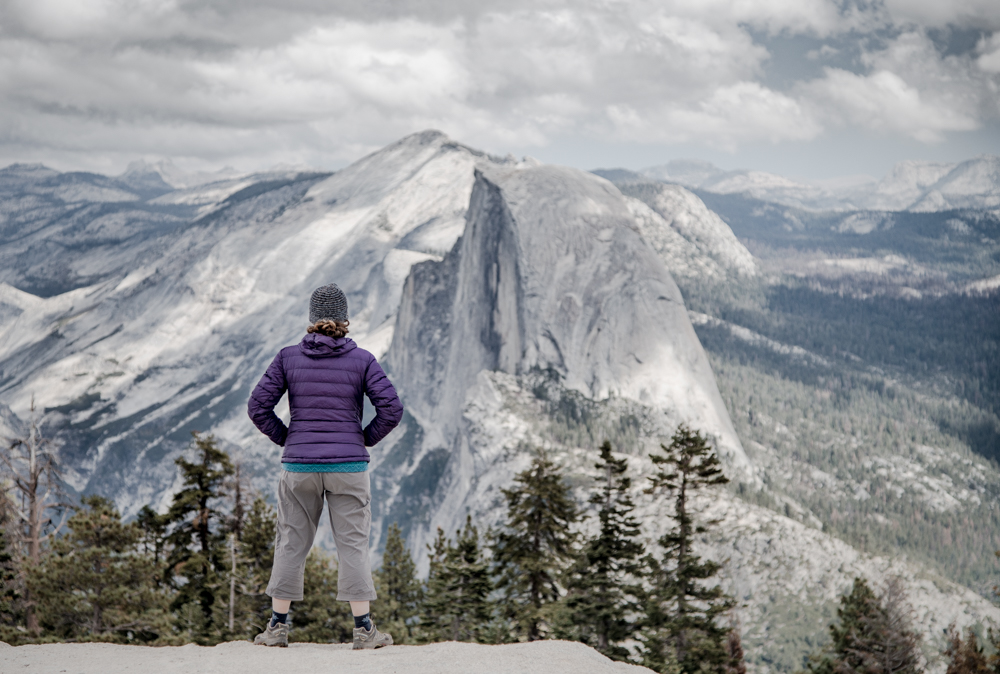
2016There are volumes written about the hike to Half Dome along with some videos from the park service, so I won’t cover the hike in detail. Suffice it to say, it’s a long day… about 16 miles and 5000 vertical feet of elevation gain. Anne and I both got over 55,000 steps on our Fitbits. We got started early and were on the trail by 7am, expecting a full 12 hour day.
Starting from the valley floor you gain elevation steeply and steadily as you first pass Vernal Falls and then Nevada Falls. We took the “Mist Trail” that was anything but; both waterfalls were a trickle of their normal selves. Once the top of Nevada Falls is attained, you’re a little less than halfway to the summit dome. The path wanders casually through the Little Yosemite Valley before beginning a long and fairly relentless climb to the top of sub dome, punctuated briefly by a flat and beautiful forest.
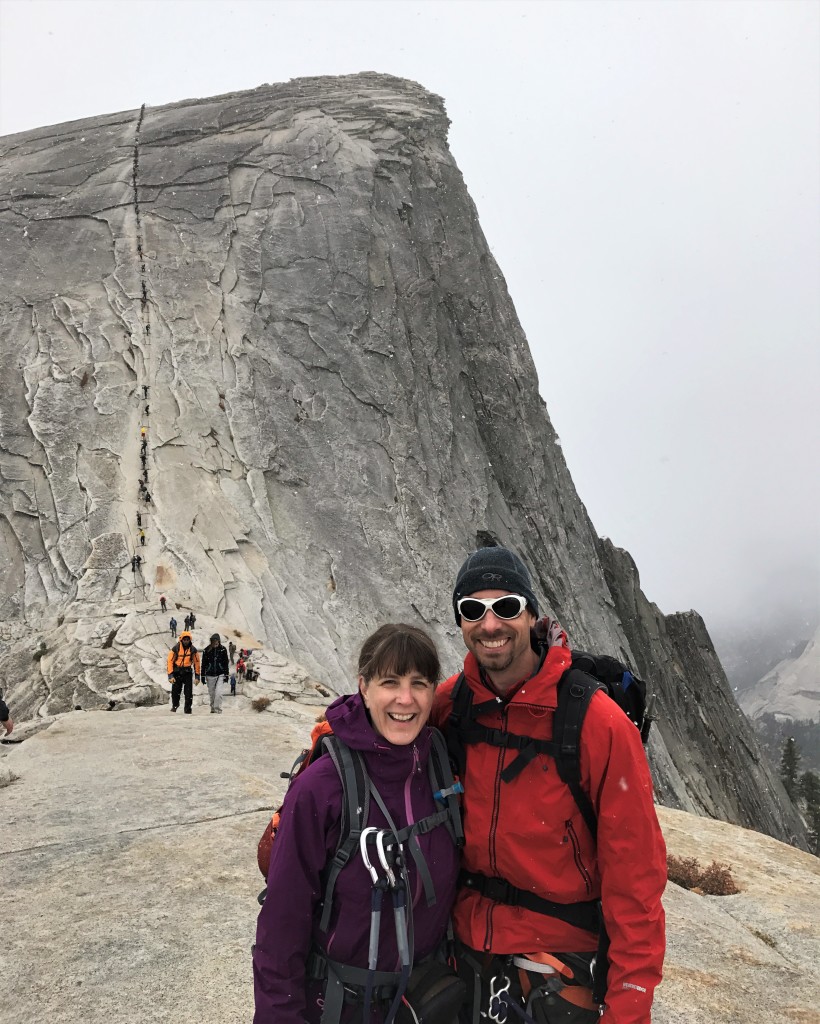
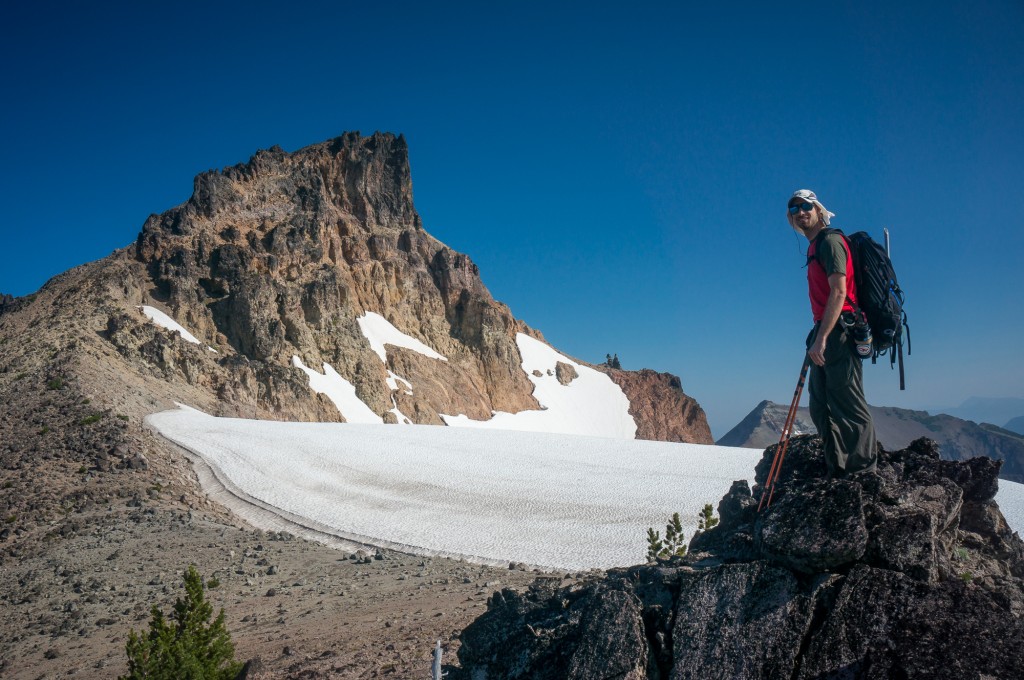
Once we broke out of the trees we could see that the weather, which had been overcast all morning with a 15% chance of rain, had actually moved in around us and snow began to lightly fall. As we got to the top of sub dome, we talked with several people and watched those climbing and descending to determine if it was safe to head up. We’d almost made the decision to make the climb when folks on the cables started yelling to everyone to head down, so we aborted plans.
A note here about gear. Most people on the cables didn’t have any gear except gloves. Anne and I both brought harnesses and via ferrata leashes to ensure our safety in the event we or someone else fell. Given the consequences, I was honestly appalled at how many people seemed completely unprepared to be safe especially given the rapidly changing conditions.
The hike to the valley was uneventful and long, with light snow and then light rain. Conditions on the top of Half Dome continued to deteriorate, making both of us happy we decided to turn around instead of continue and leaving a nice goal for our next trip to Yosemite.
Total distance: 31.33 mi
Max elevation: 8412 ft
Min elevation: 4037 ft
Max elevation: 8412 ft
Min elevation: 4037 ft
Oct
23
2016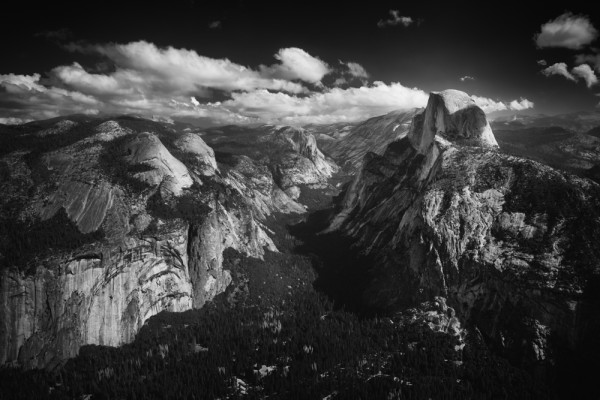
Six months ago or so Anne put in for permits to climb Half Dome and we were able to get a climbing slot on October 3. So we set out planning a Yosemite trip around that date, secured the necessary camping reservations, and planned a camping trip for the Van we knew would be coming mid summer. The plan basically looked like: Leave Friday, get to Yosemite Saturday night, explore Sunday, climb Half Dome Monday, hit the Tuolumne Meadows area, see Mono Lake, and maybe climb Lassen on the way back.
Lower Pines
We camped the first three nights in Lower Pines campground. The location was close to the Half Dome trailhead and provided some pretty spectacular morning scenery.
Glacier Point, Sentinel Dome, and Taft Point
Sunday was our first full day in the park and we tried to do easy hiking at elevation to help us acclimatize to the altitude of the park. We started with the view at Glacier Point and then used the afternoon for some short hikes.
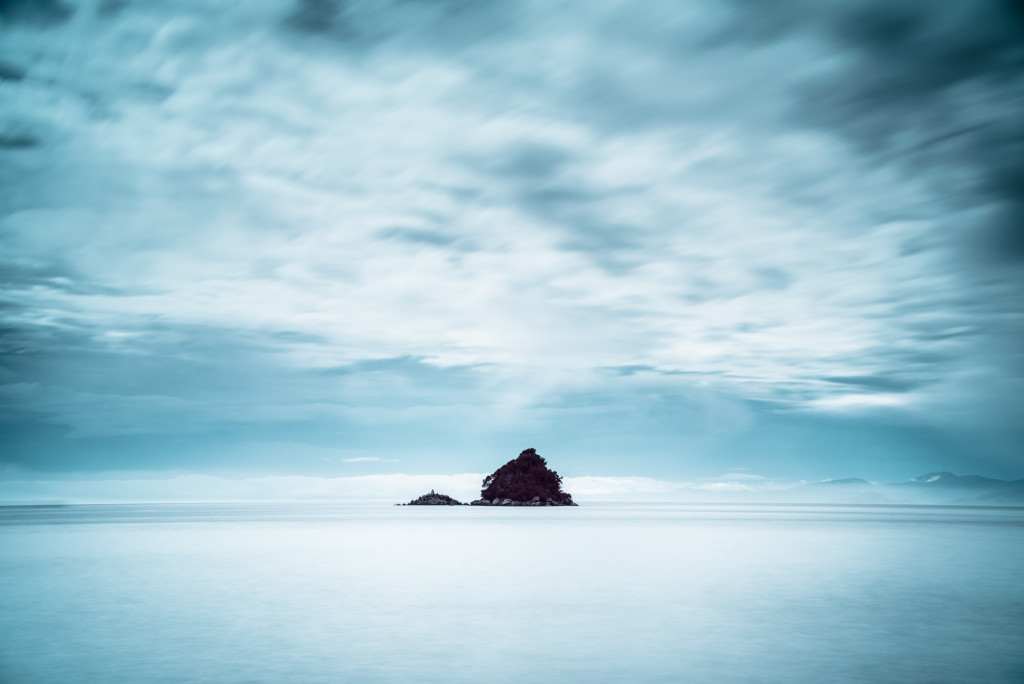
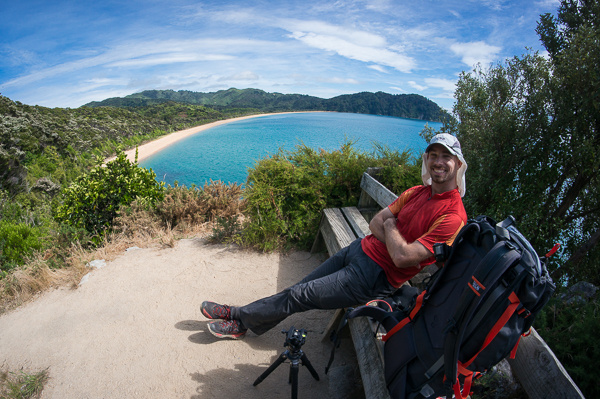
Sentinel Dome is a short hike with small elevation gain that leads to an easily climbed granite dome offering superb views up and down the valley.
Anne looking at Half Dome from Sentinel Dome
Taft Point is another short hike from the same trailhead that yields extraordinary views of El Capitan and offers abundant opportunities to look straight down to the valley floor (not for the feint of heart).
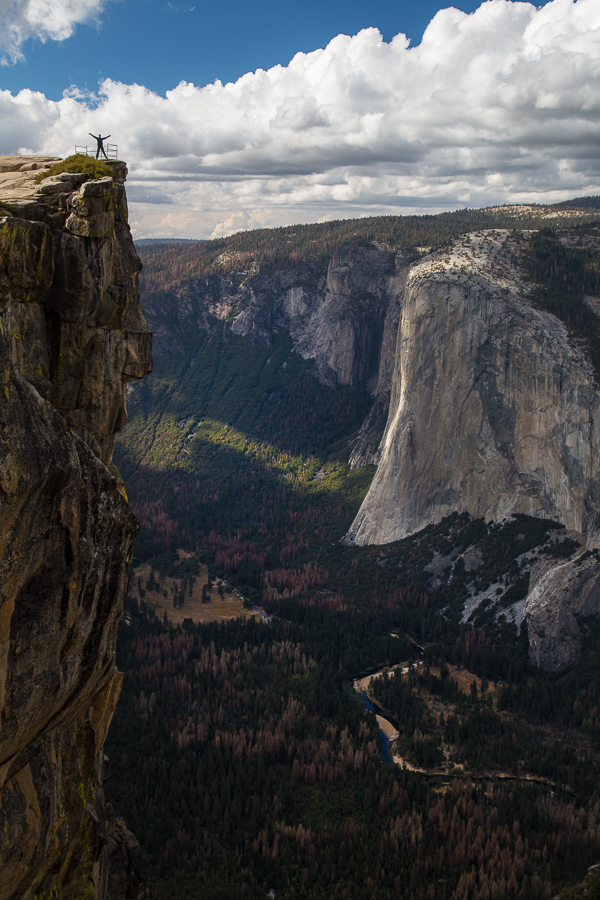
Nate at Taft Point (photo by Anne Archambault)
We concluded the day with dinner in the van and a surreal sunset at Washburn Point.
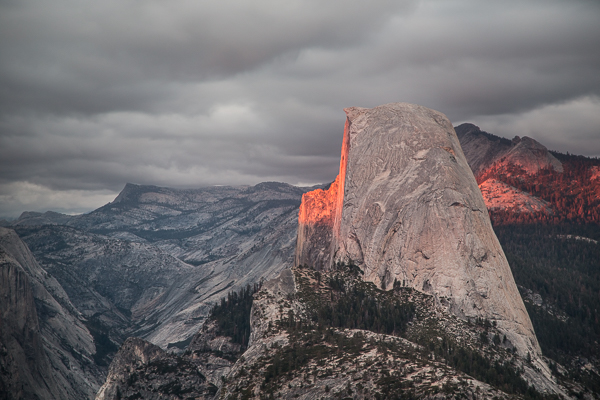
Half Dome from Washburn Point at sunset (photo by Anne Archambault)
Oct
15
2016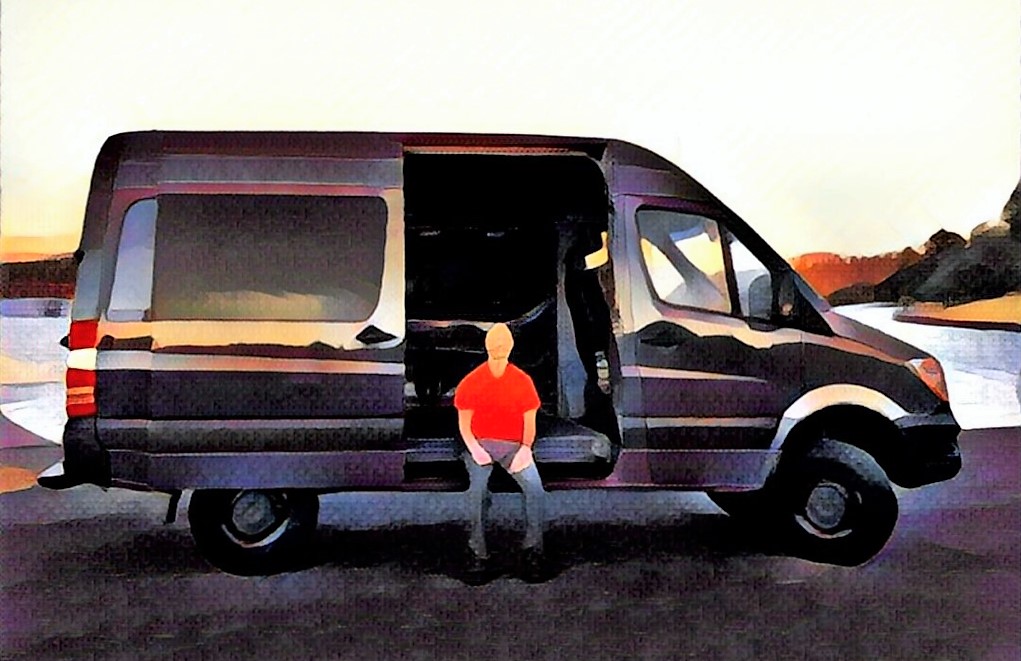
It’s been a long time since I last posted. About two years to be exact. Things get busy and next thing you know there are countless adventures that need to be posted and if feels like there’s no way to catch up. But, I’m going to do my best to post short pieces rather than the lengthy posts I’ve done in the past just so I can stay on top. I’ll try and throw in an occasional older piece now and then too, like the Alta Via and some of the rest of the New Zealand trip. And the Grand Canyon rafting trip too 🙂
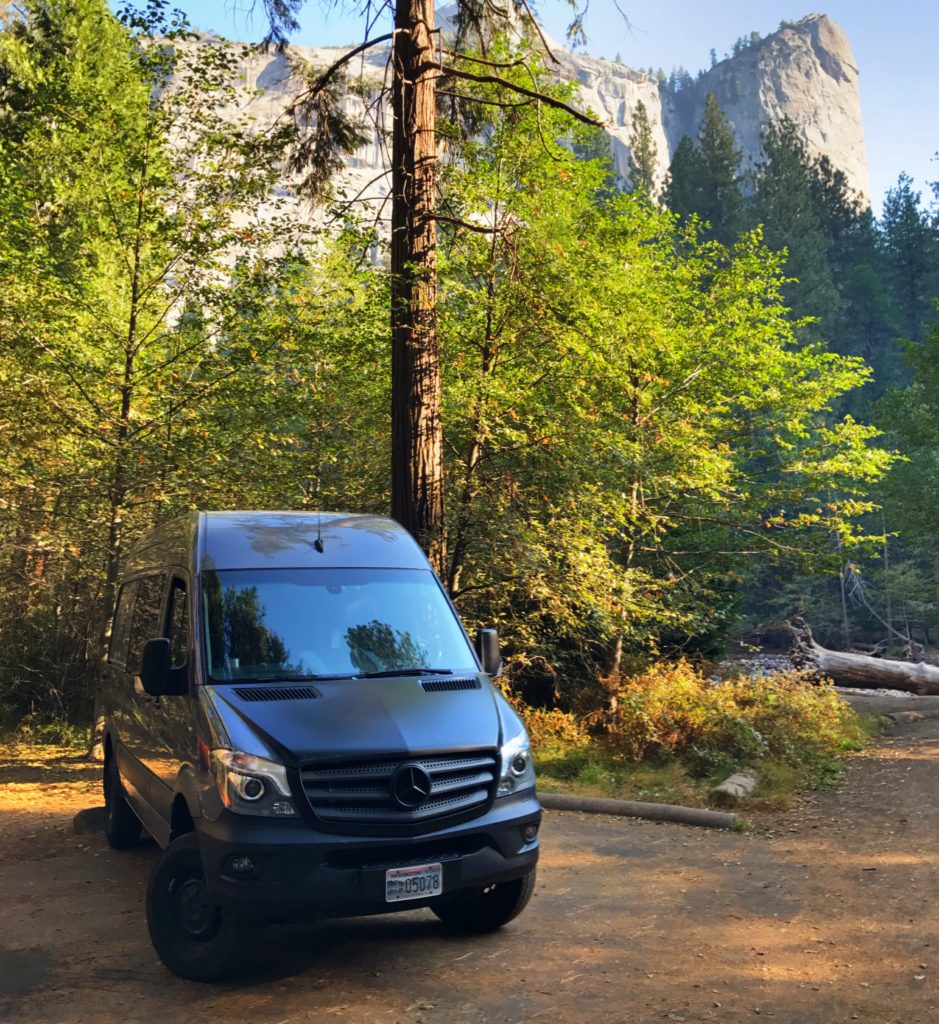
But that’s not this post. No. This post is about the newest member of the family: A Mercedes 4×4 Sprinter Van
I’ve been reading a lot on Van Life and finally decided to get rid of the Audi and move to a van. It’s a heck of a change, but one that’s already been a lot of fun. We’ve taken the van (haven’t yet decided on a name) to North Cascades, Goat Rocks, Mt. St. Helens, Mt. Baker, and most recently to Yosemite, Mono Lake, and Lake Tahoe.
Here are some quick picks of the van in action.
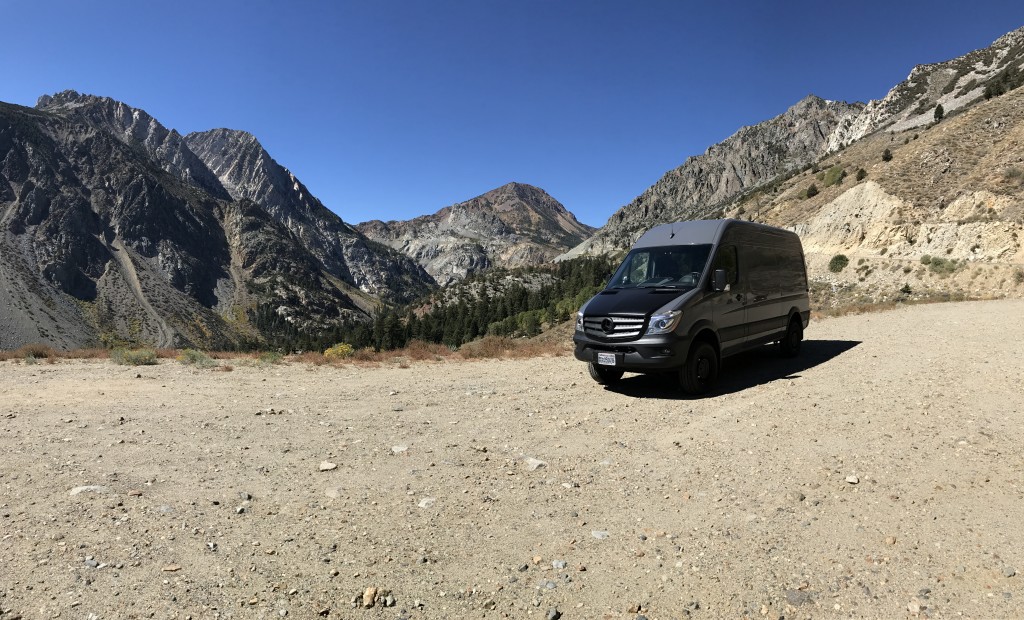
The Van at Tioga Pass
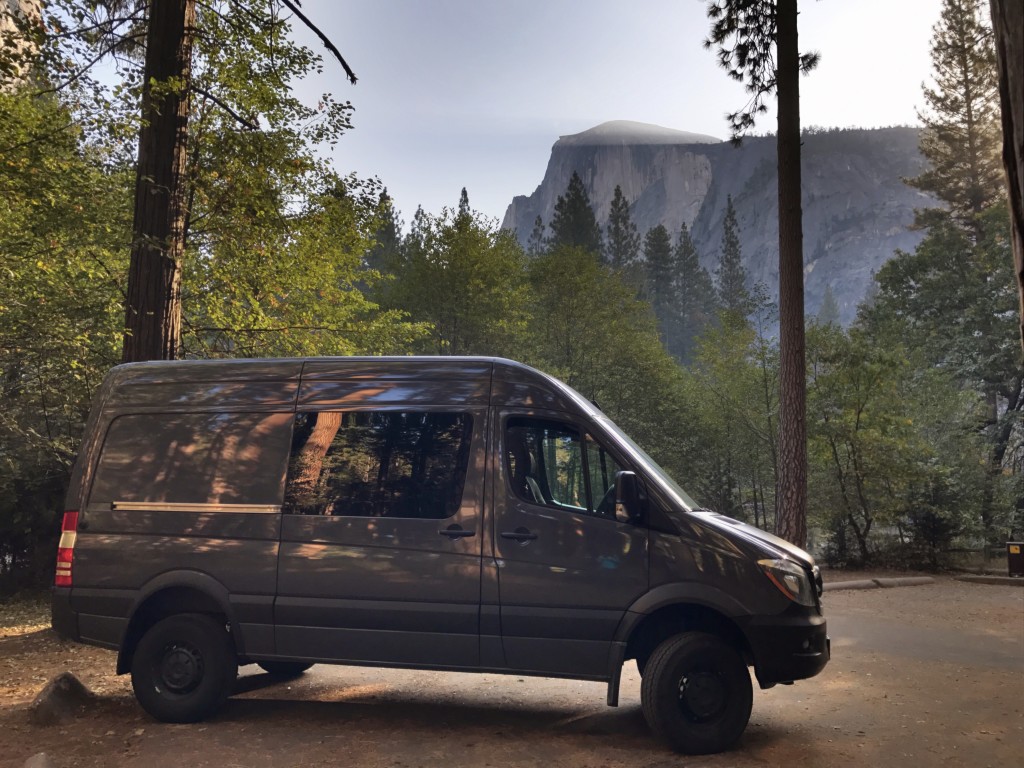
Camping in Yosemite Valley
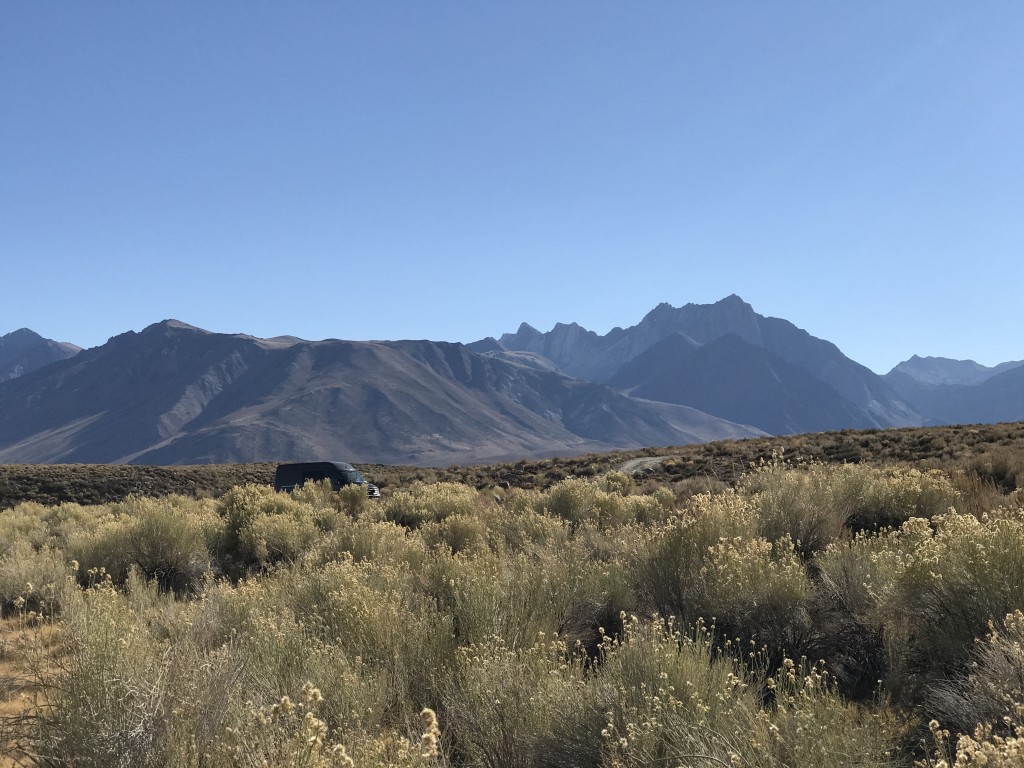
Van trying to hide
Right now the van is just a simple cargo van. I’ve added a platform bed in the back so we can sleep, and we’ve gotten simple amenities like blackout curtains for privacy and warmth. We’ll be getting the van customized by Van Specialties in Oregon. If you want to see a great set of pics, you can check out Outside Van too. More on that process later as we start deciding what’s going to happen.
Dec
06
2014
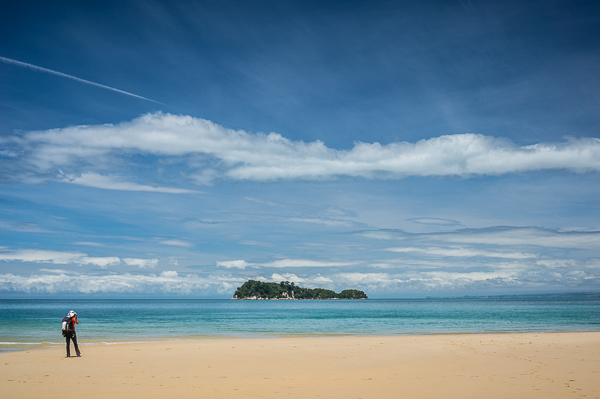
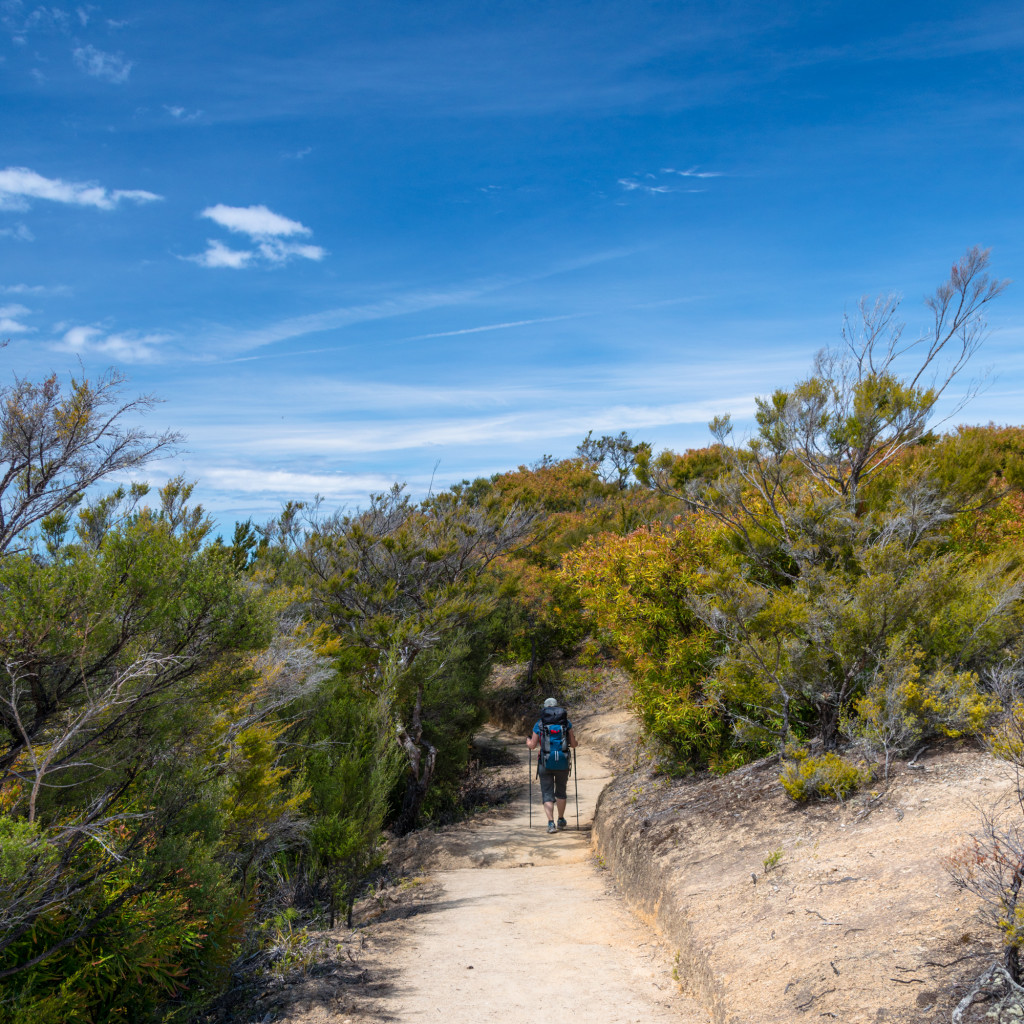
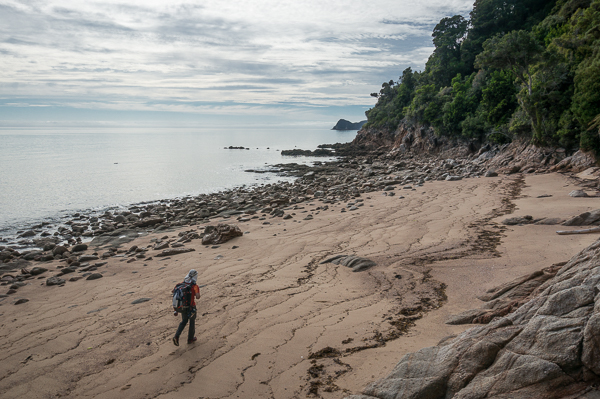
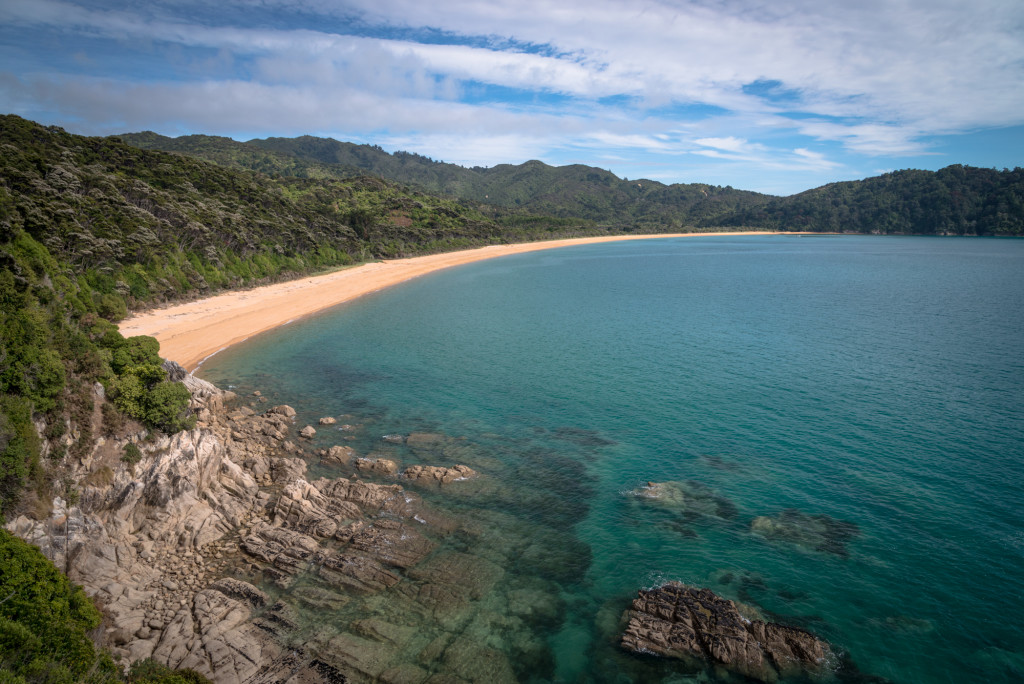
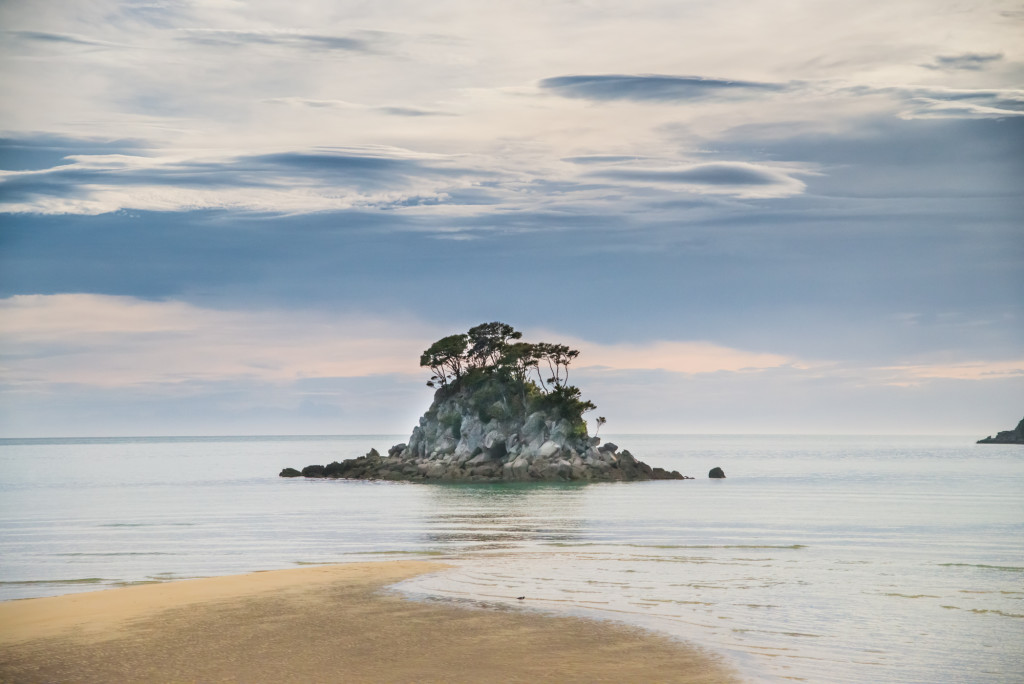
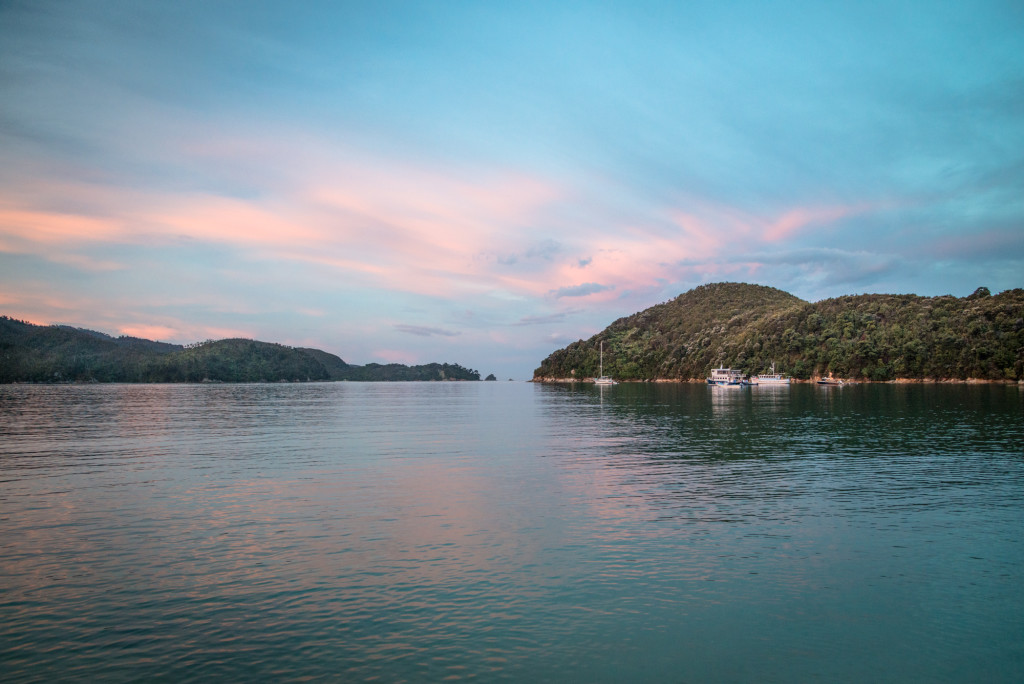
There are several “Great Walks” in New Zealand that receive very positive reviews in guidebooks and online. The Abel Tasman Track is one of these walks that generally receives “not to be missed” praise. It is in fact the most popular Great Walk in New Zealand. Located in the Abel Tasman National Park on the South Island’s northwest coast, the walk extends roughly 56 km from the start at Marahau to the end of the track at Wainui. Anne and I did a shortened version of the trip over 4 days in December (6-9) from Marahau to Totaranui covering 41.4 km.
(photo by Anne Archambault)
The track mostly follows the coast line, sometimes on beach but mostly on very well maintained trails in the forest overlooking the Tasman Sea. The myriad streams and small canyons along the way are bridged — some with impressive suspension bridges. In two places, there are relatively significant tidal crossings that can only be done within an hour or two of low tide.
Overnight accommodation is provided in both Department of Conservation (DOC) huts as well as campgrounds. The huts must be booked well in advance and provide drinking water, toilets, and sleeping pads in bunk style dorm rooms. The length of the track (through Totaranui) is serviced by water taxi, which allows hikers to access any point along the trail easily. This is a blessing and a curse, it allows for myriad options to explore the trail, but also allows scores of day trippers to visit huts and campgrounds that would otherwise be 2 days from the trailhead.
(photo by Anne Archambault)
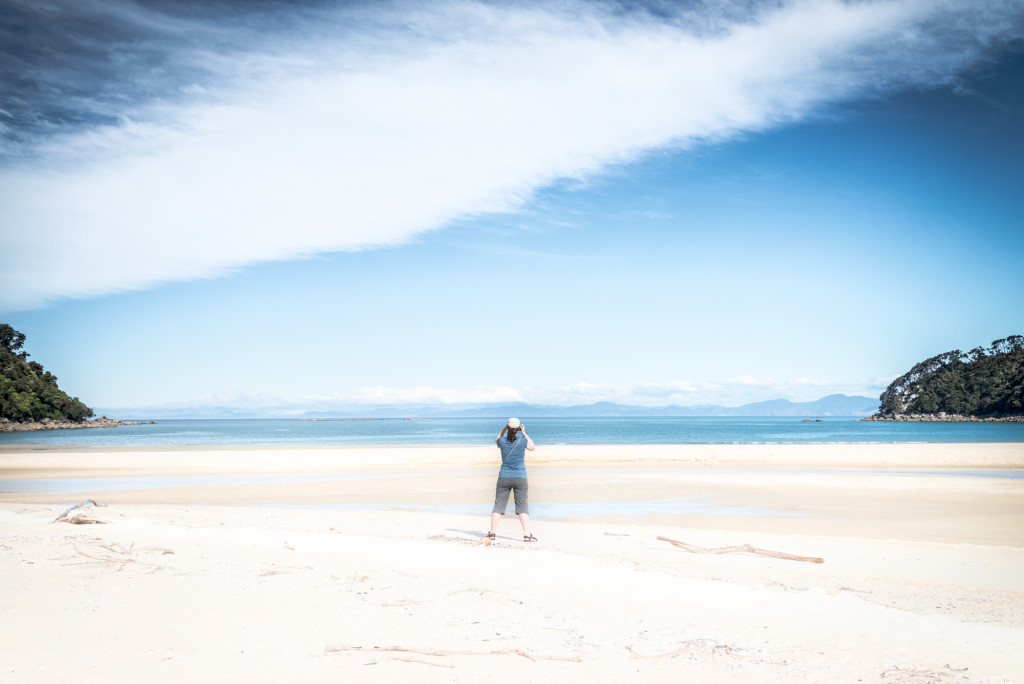
Beaches and Beautiful Blue Water
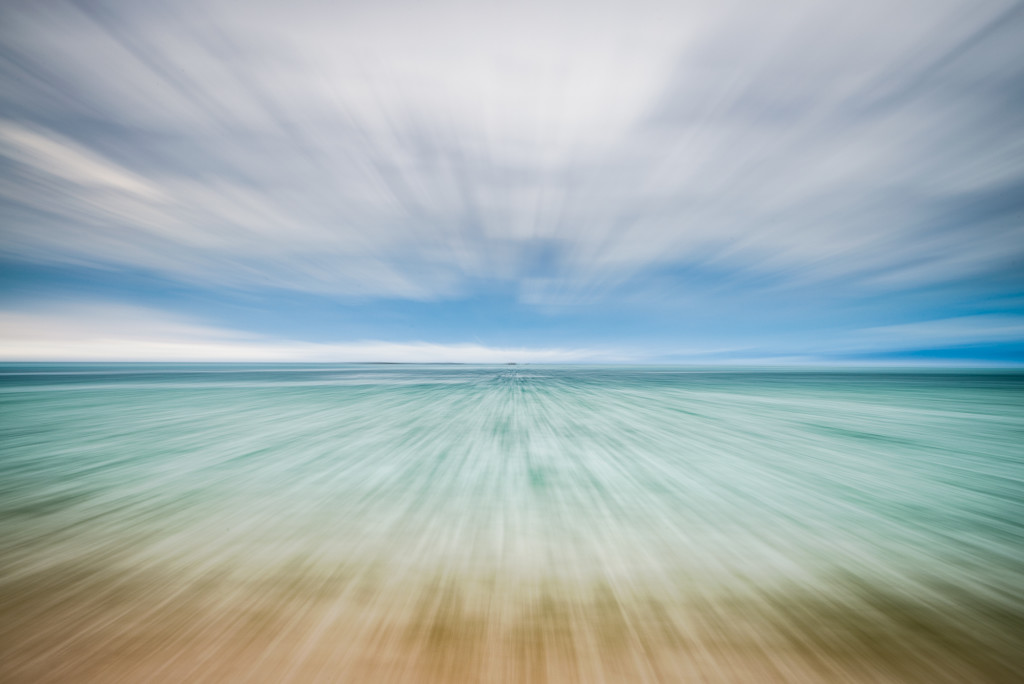
The highlight of the track is the proximity to the beautiful beaches and pristine blue water of the Tasman Sea. Without knowing better, it would be easy to mistake the coastline for beaches in Thailand or Hawaii.
In some places, rocky granite outcroppings form small islands just offshore. These provided a wonderful opportunity for us to take a break from the walk and pull out the camera gear. We didn’t use the tripod often, but in these cases it was very handy for long exposure compositions.
Because of the way the hike is laid out, Anne and I were generally able to complete our hike by early afternoon, giving us plenty of time to rest and relax at the hut. Alternatively, many hikers took the opportunity to stop along the way at secluded or otherwise wonderful beach locations and relax.
Of course the beaches also provided wonderful sunrise and sunset photography. At Anchorage Bay, we had to be up at 5am to make the tidal crossing and were able to watch an amazing sunrise bloom over the hills.
Wildlife
The national parks we visited on the South Island all had robust conservation efforts in place to help protect indigenous species. Invasive species such as possums, rats, and stoats have decimated the native bird populations. Along the track are literally hundreds of traps designed to kill these predators.
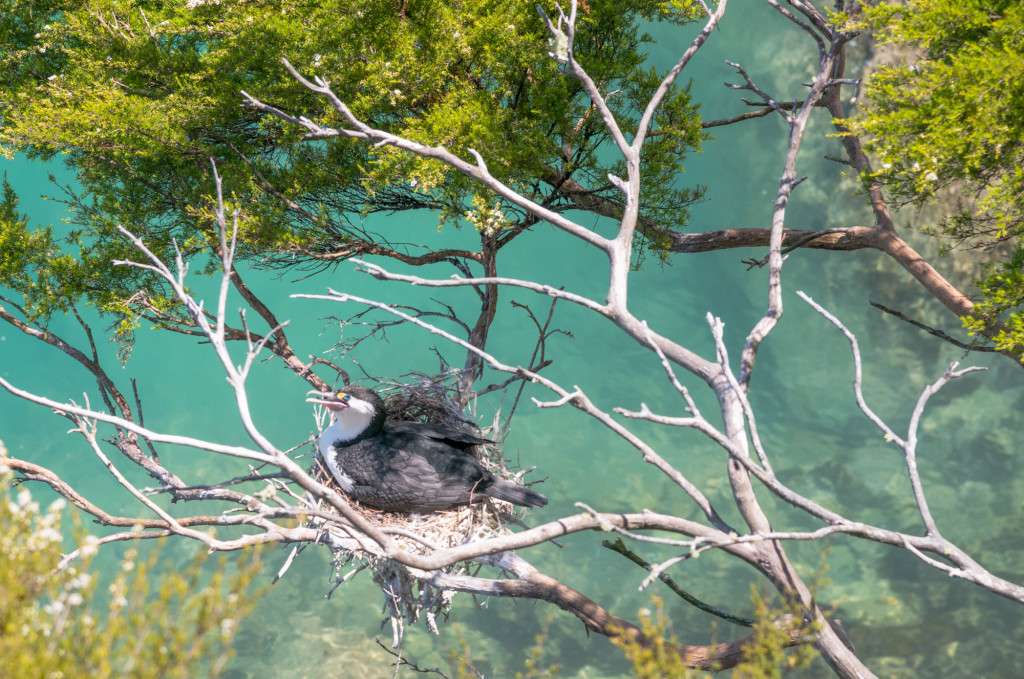
Many of the islands visible along the track are sanctuaries where native species can nest in relative safety. There is also the Tonga Island Marine Reserve to help protect dolphins, seals, and the many native species that inhabit the diverse system of waterways, estuaries, and bays. Fur seals come here to lay their pups and penguins sleep along the rocky headlands.
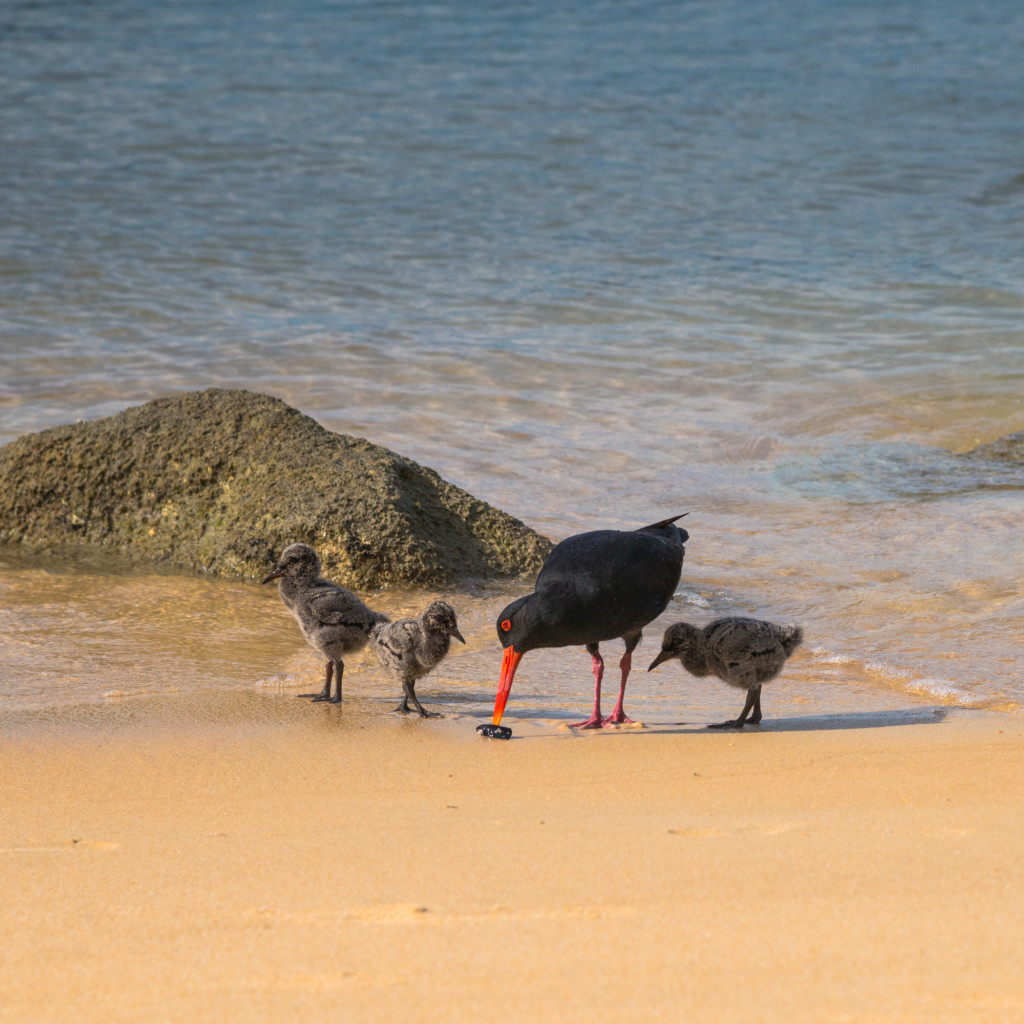
Because we were walking the track in the southern hemisphere’s summer, we were also able to see a lot of young chicks. At Anchorage Bay, a pair of variable oystercatchers had a set of three chicks that allowed us to approach during low tide.
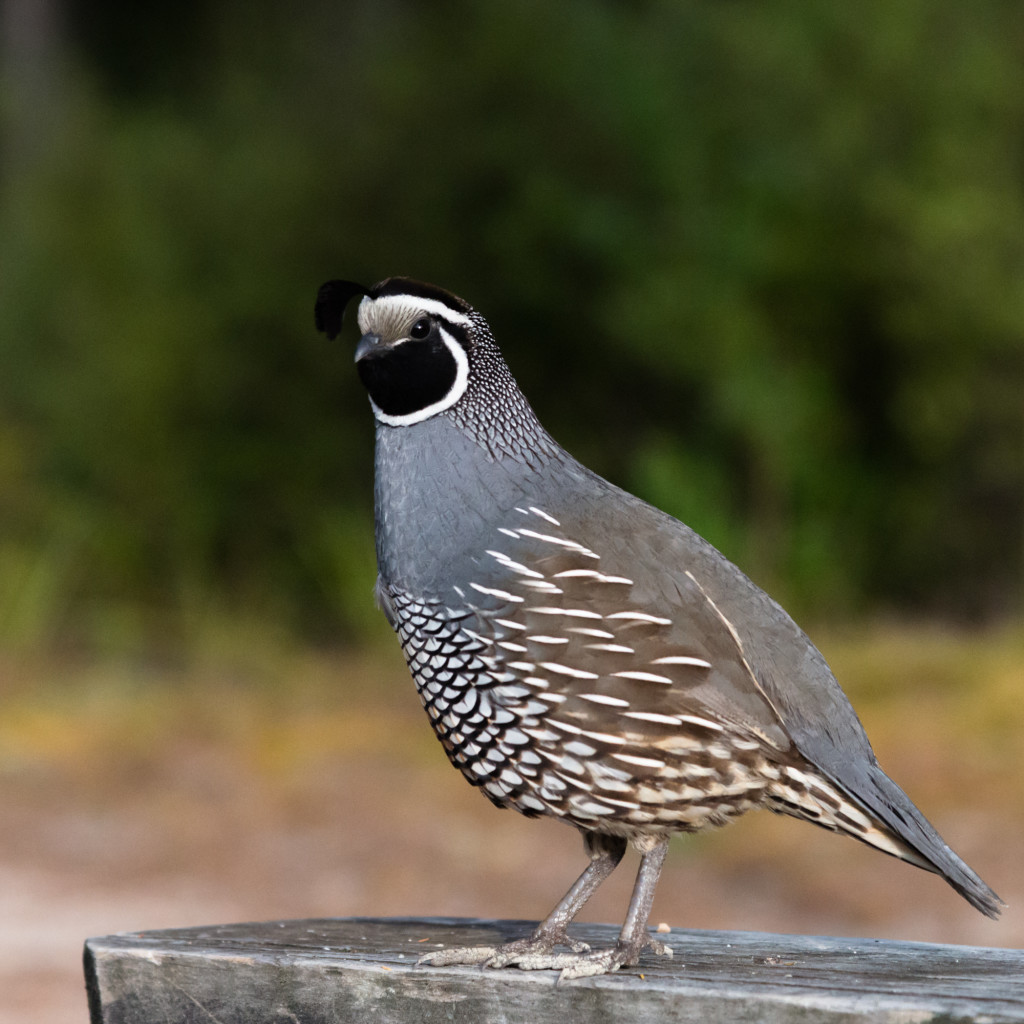
We also saw many of the native quail, some with broods as large as 6 or 8. Some of these quail were quite tame and even posed a little.
Incredible Flora
It’s hard to discount the incredible flora of New Zealand. In Abel Tasman National Park, the forest is dominated in the undergrowth by ferns both small and large. Tree ferns and beech form the bulk of the forest canopy, punctuated by fragrant flowering manuka trees (famous for their honey).
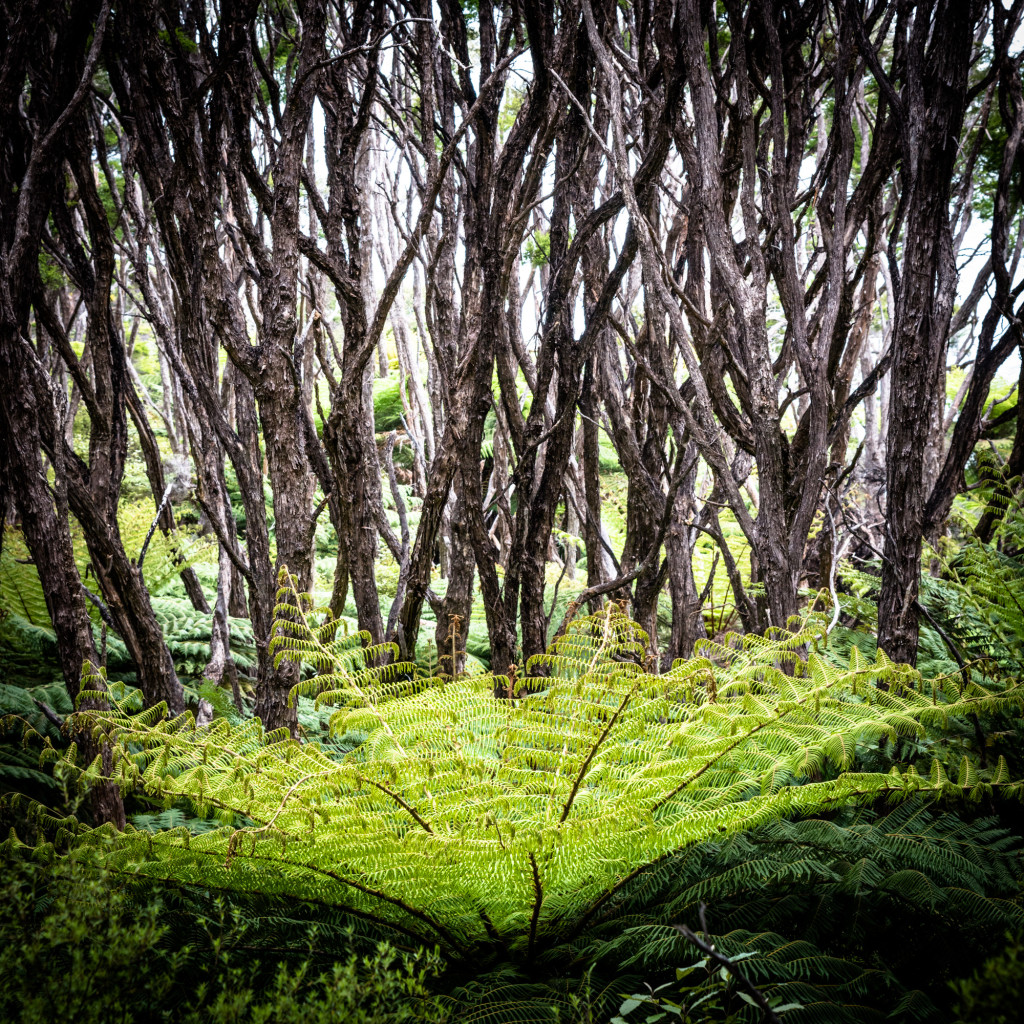
The ferns lend a prehistoric feel to the forest and you could be forgiven for thinking you might be walking on the set of Jurassic Park. In fact, we talked to one person who was sure they filmed some scenes from the movie in the park.

(photo by Anne Archambault)
Should you go?
In short, yes. The trail is fantastic, the days are short, and the scenery is well worth it.
The trail is a little more crowded than other tracks, both because of the relative ease and the easy access. It’s a great warm up for longer or harder walks and it’s also great for families (of which we saw many).
(photo by Anne Archambault)
And who could argue with lots of time on the beach? Anne and I both felt like 4 days was plenty; it provided enough time to get into the backpacking groove without feeling like we were spending more time than we should (the south island is big, we didn’t want to miss anything).
Total distance: 9.73 mi
Max elevation: 385 ft
Min elevation: -283 ft
Max elevation: 385 ft
Min elevation: -283 ft
Dec
03
2014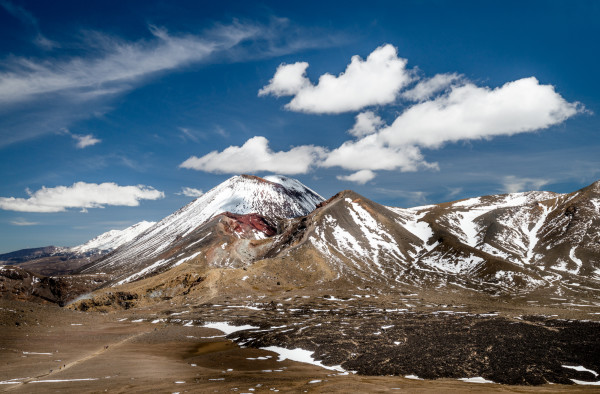
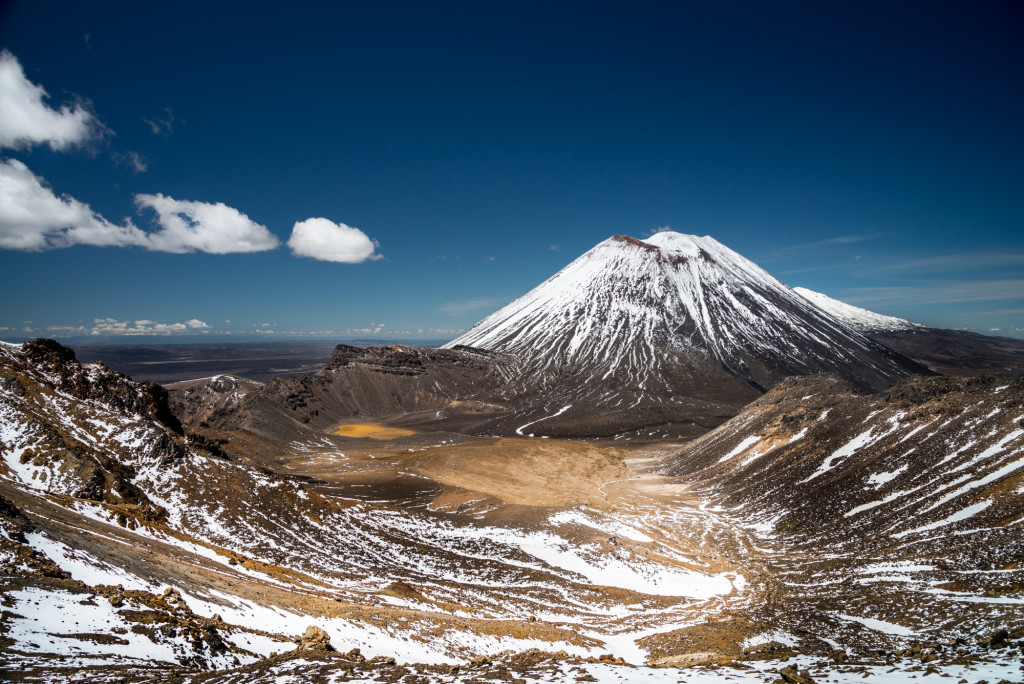
As part of our vacation in New Zealand, Anne and I had a set of “Great Walks” planned. One of those was the Tongariro Northern Circuit that circumnavigates the beautiful volcanic cone of Mt. Ngauruhoe (also known as Mt. Doom in the Lord of the Rings movies). The Northern Circuit is normally a four day walk serviced by DOC huts. However, the weather forecast for the days we had booked was terrible; gale force winds, rain, and a low cloud ceiling which would have precluded any views of the mountains. So we changed plans, looked for a weather opening, and did the one day crossing instead.
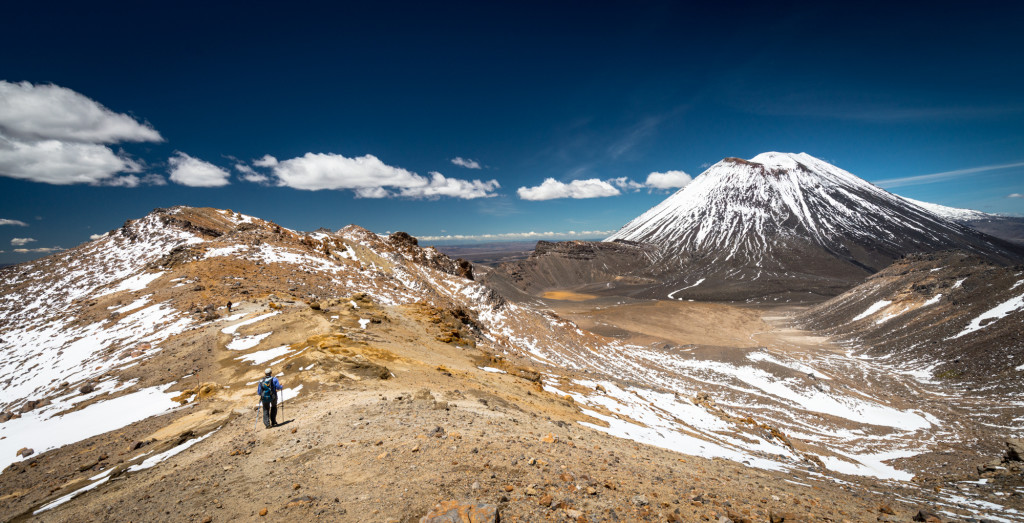
The Tongariro Alpine Crossing is billed as one of the greatest day hikes in the world, and I think Anne and I would be compelled to agree that it’s certainly high on the list. Between the well maintained trail and the incredible views it really is a winner. The only drawback was the sheer number of people also doing the crossing, which on the day we made the crossing must have been in the hundreds.
The hike from the trailhead up to Soda Springs crosses sub-alpine scrub, following the course of a small stream. The trail here is exceptional and well graded with many areas having full boardwalks. Views up to Mt. Ngauruhoe only improve with each step.

From Soda Springs, the trail climbs steeply up to the South Crater entrance. While steep, this path is still excellent with most of the trail formed into actual stairs. Gaining in elevation, we were able to see Mt Taranaki standing sentinel over New Plymouth some 50 or 60 miles distant. The trail quickly gains elevation, traversing the flank of Ngauruhoe and entering the South Crater where the summit path up Mt. Ngauruhoe branches off.
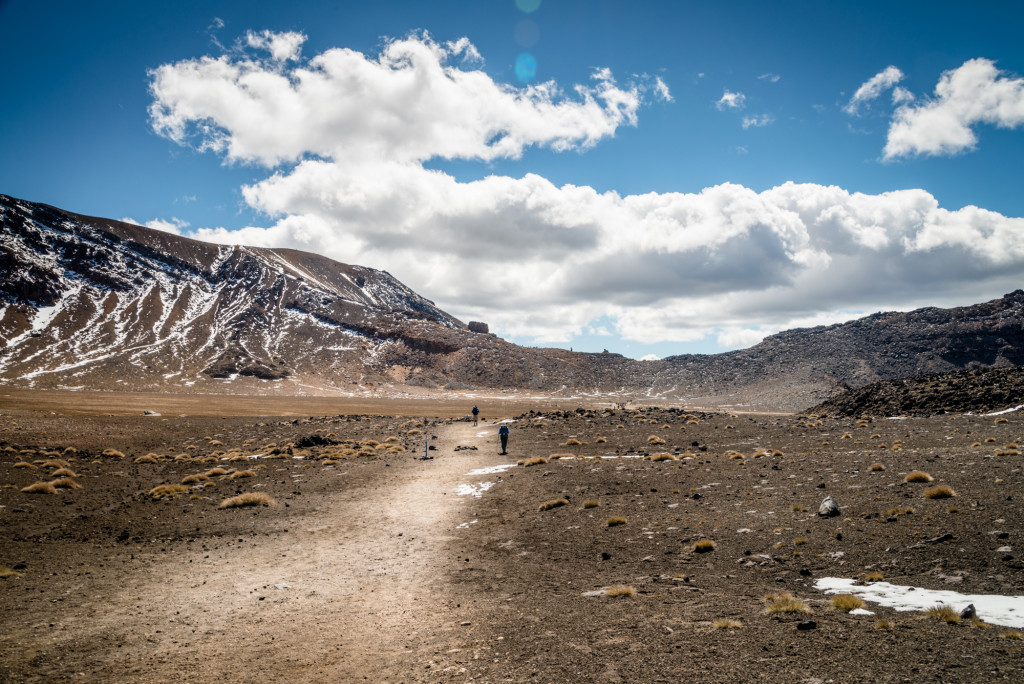
The Alpine Crossing trail continues across the South Crater, which is actually thought to be an in-filled glacial cirque rather than an actual volcanic vent where it climbs again, more steeply, to gain the top of the red crater.
[jwplayer mediaid=”1665″]
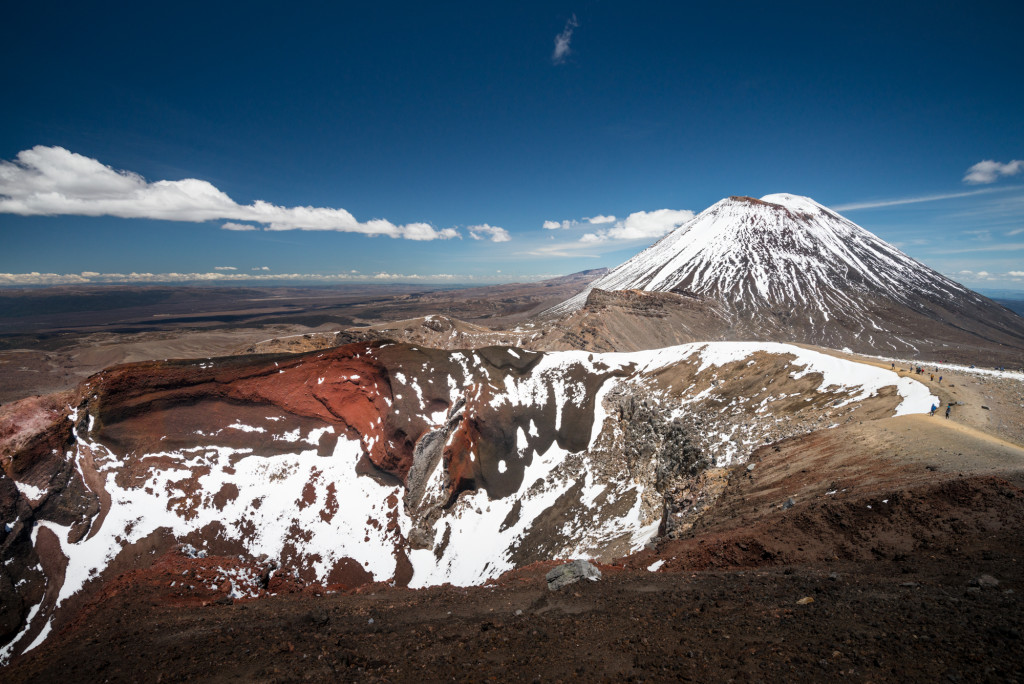
Anne and I took the side trip to the summit of Mt. Tongariro. This was a relatively short detour with limited elevation gain but it provided extraordinary views over the South Crater and across to Mt. Ngauruhoe. The summit rewards hikers with outstanding views in all directions. I think it’s a detour that should not be missed.
Back on the main trail, the path climbs slightly to a viewpoint over the Red Crater before descending steeply down a very loose volcanic scree slope to the Emerald Lakes.
Hikers should take note that at this point the hike is about halfway done, though virtually all of the uphill has been completed.
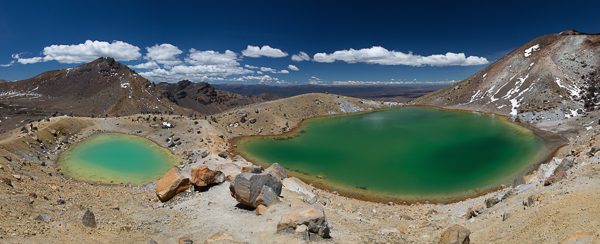
A hike across the Central Crater followed by a short climb brings hikers to Blue Lake, which is actually another crater that’s about 9700 years old. This serves as a wonderful vantage point back across the Central Crater and Mt. Ngauruhoe, which is now partially occluded by the Red Crater and the shoulder of Mt. Tongariro.
The rest of the hike from this point is relentlessly downhill to the Ketetahi Car Park. The trail passes through the active volcanic zone of Te Māri crater where an explosion in 2012 left a hole in the Ketetahi Day Shelter that is still on display.
From the shelter to the car park the trail winds first through alpine scrub before descending into the trees of the forest. This section of the hike is much longer than it appears on paper and should not be underestimated. We were only just able to make our shuttle pick up time 8.5 hours after drop off because we didn’t appropriately estimate how long this last section of the trail was. It should also be noted that even though signs posted times that showed us as on track, these didn’t seem to accurately reflect the time/distance towards the end of the trail. All that to say, if you do the crossing, factor in a little buffer.
In all, the Tongariro Alpine Crossing was a fantastic day hike. It’s certainly worthy of a top mention for all the day hikes we’ve done in the world, though whether or not it occupies the top slot needs some consideration.
Total distance: 14.63 mi
Max elevation: 6457 ft
Min elevation: 2574 ft
Max elevation: 6457 ft
Min elevation: 2574 ft
Nov
26
2014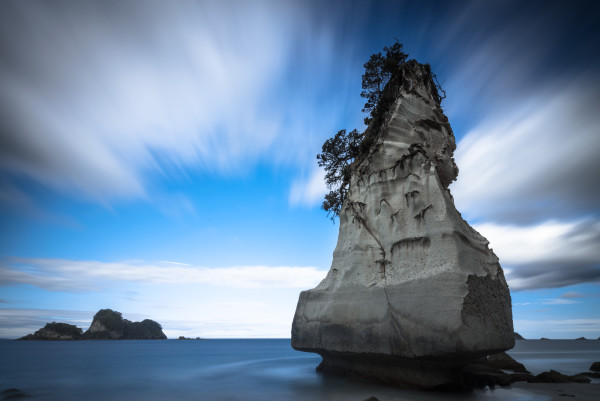
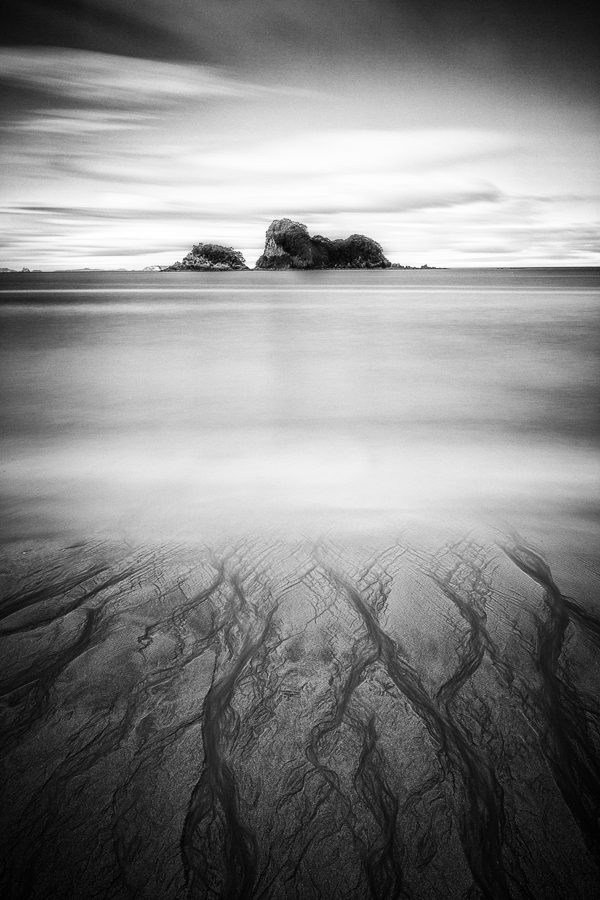
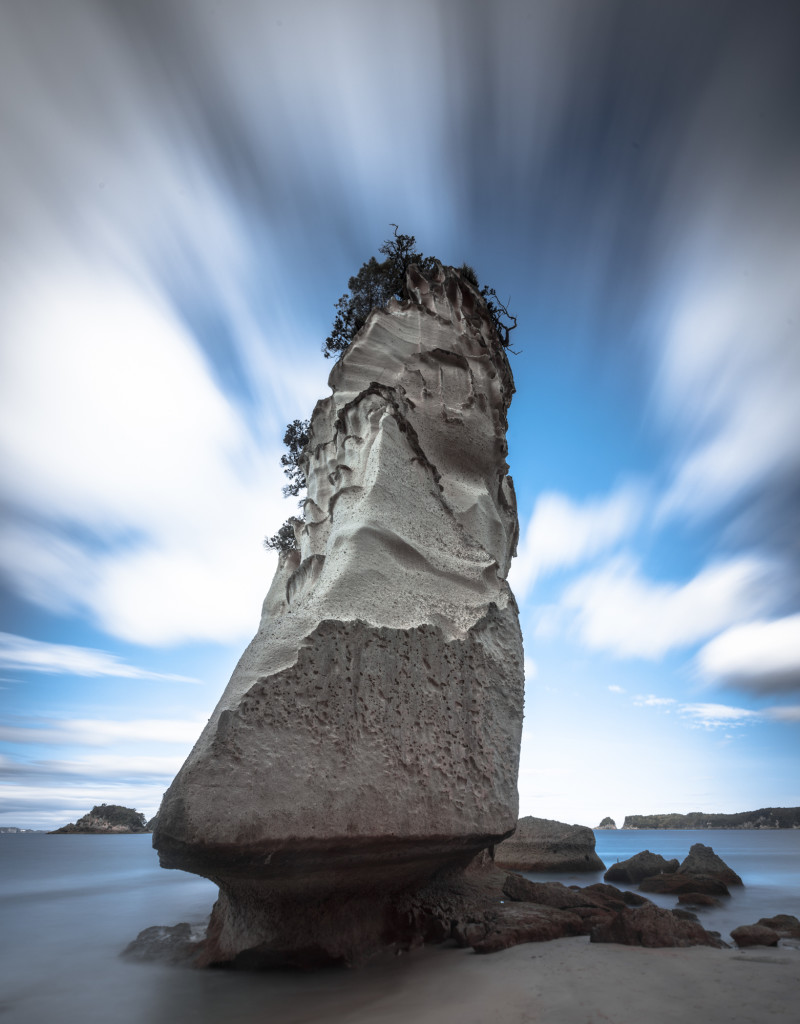
Situated on the Coromandel Peninsula, Cathedral Cove offers sea stacks and a large archway that connects two beaches. Images taken here at the right time (the beach faces east) looked incredible online. Unfortunately, our schedule didn’t really allow for photography at the extremes of the day so we did our photography in the late afternoon.
(Photo by Anne Archambault)
The cove is about a 45 minute hike from the car park, with various detours for other beaches along the way. The track provides glimpses of the spectacular coastline and the blue water below it. Walkers can do this hike in flip flops.
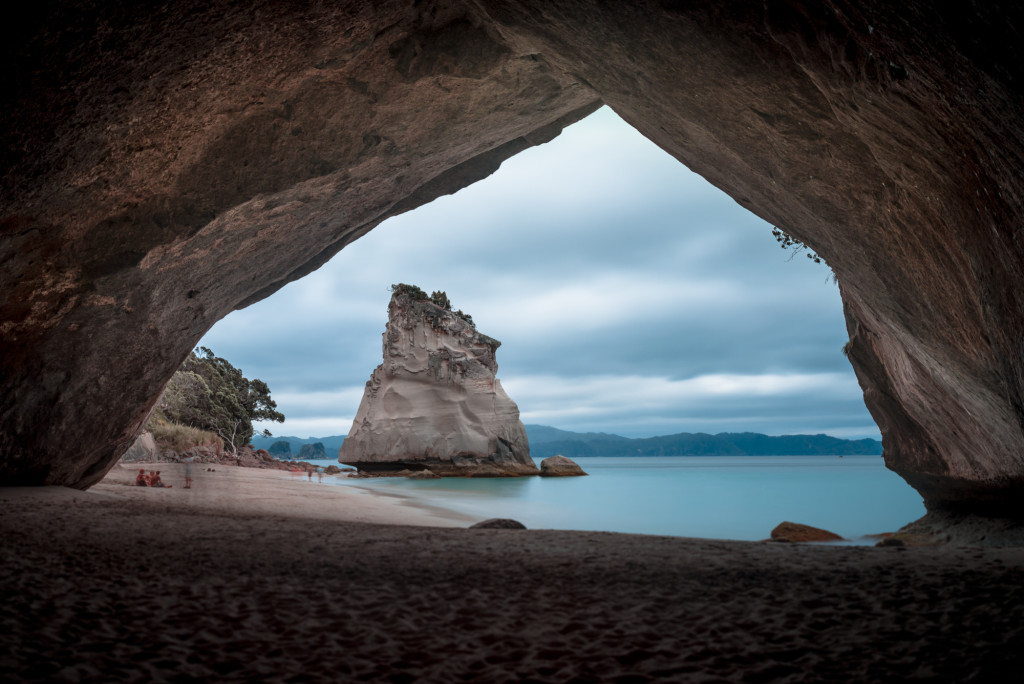
Cathedral Cove is broken into two separate beaches separated by an archway. This hole in the rock is about 150 feet across, so it’s not a trivial sea cave. On either side of the arch are beaches with their own interesting sea stacks. At the south end of the cove is a small fresh water waterfall and public toilets.
Despite being later in the day, we saw lots of photographers, beach goers, and a couple kayak tours while we were at the beach. It was a lovely place to see and one that I wish I’d been able to dedicate more time to.
Nov
25
2014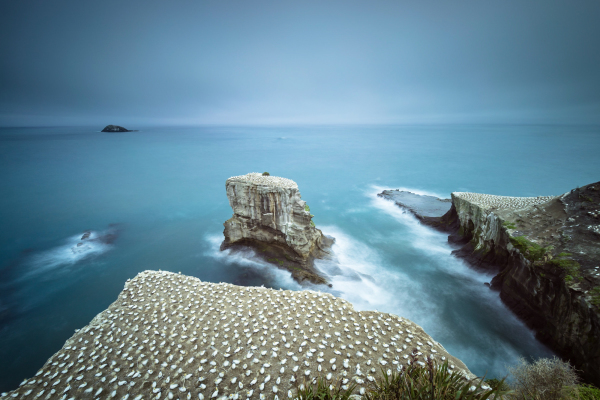
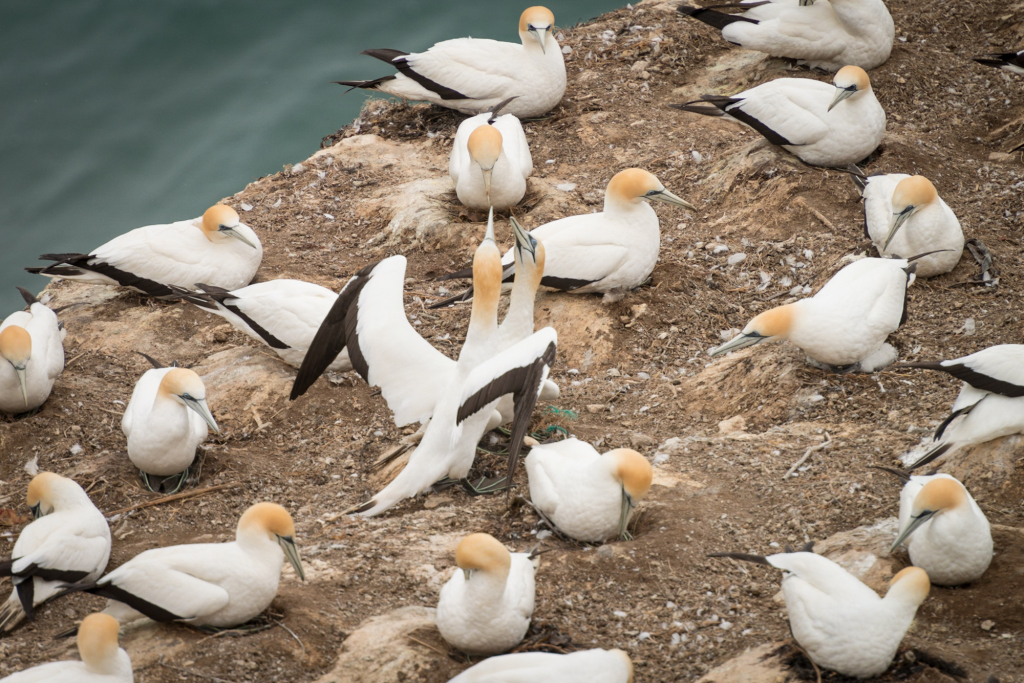
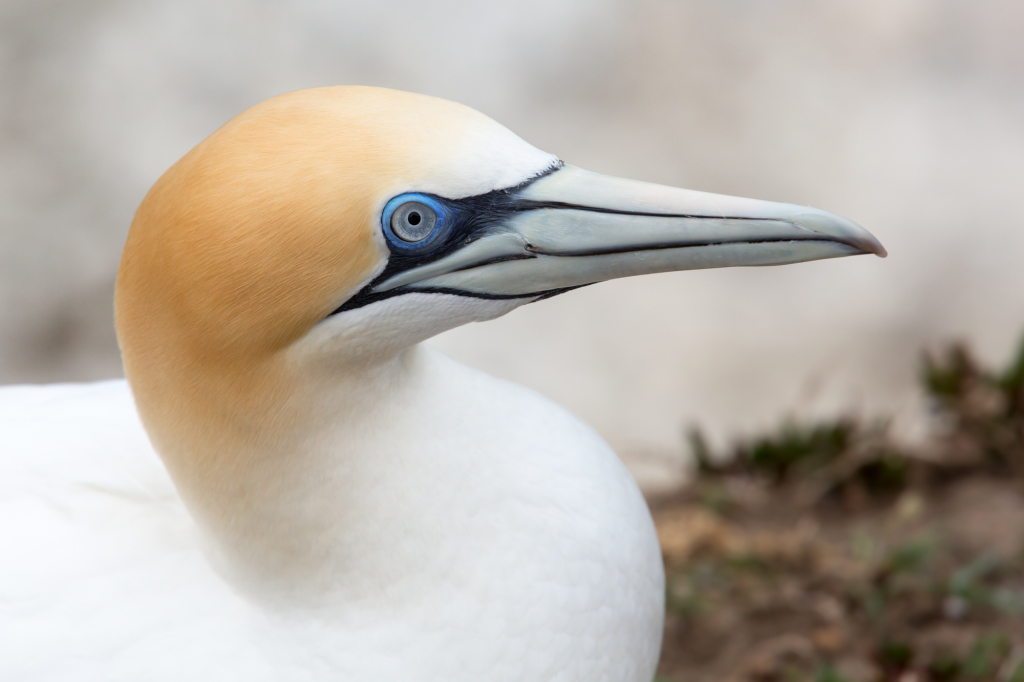
Anne and I took our first full day in New Zealand to drive to Muriwai and visit the gannet colony there. There were some pretty spectacular photos in various blog posts that we both saw, and since it was close to Auckland where we had a couple days to get adjusted, it felt like a perfect day trip.
I’d seen gannets before in Iceland, but I’d not visited a proper seabird colony since Anne and I cruised the Galapagos. Colonies such as this are vivid because of all the sights, sounds, and smells (a caution here, the smell isn’t pleasant if you happen to be downwind).
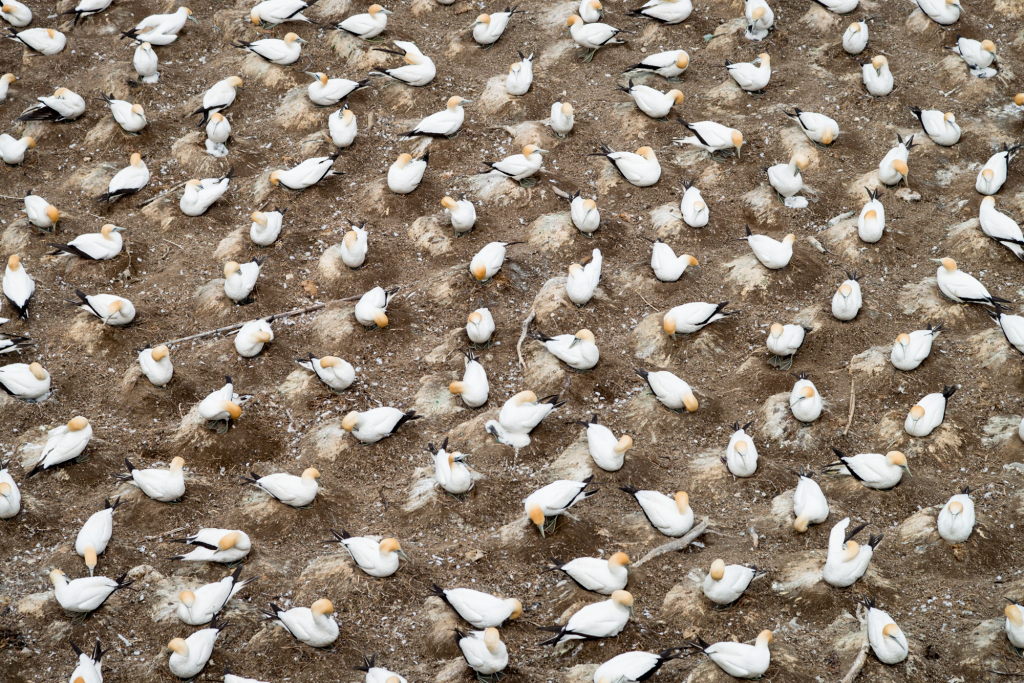
This colony is situated above Muriwai beach on a very photogenic bluff and sea stack. The birds naturally form evenly spaced nests to ensure they are out of nipping distance from their neighbors, which creates nice symmetry.
(photo by Anne Archambault)
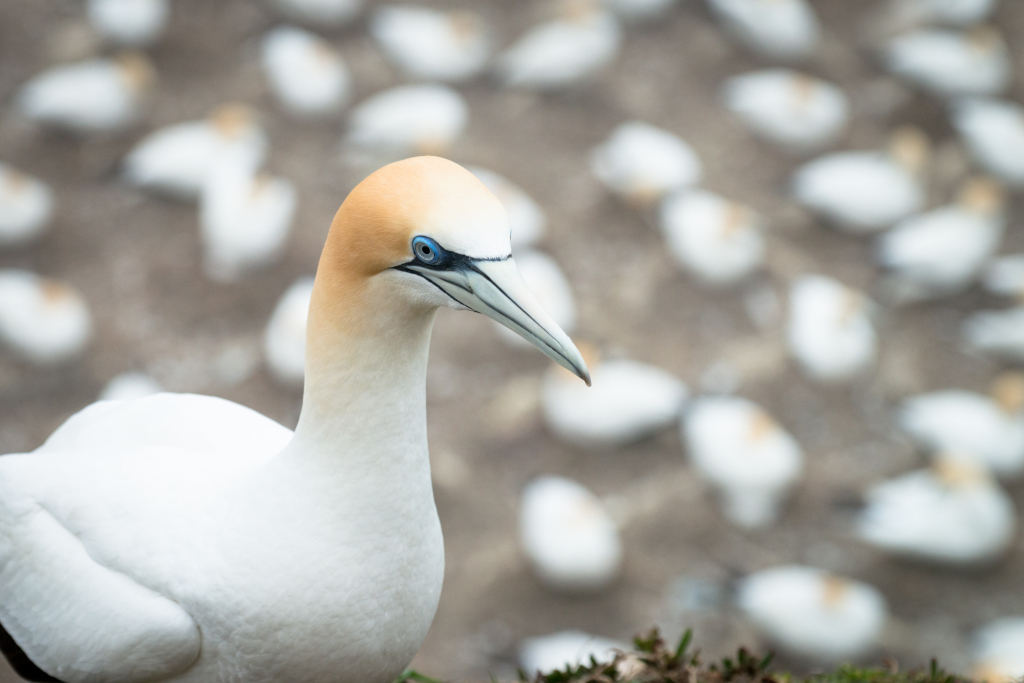
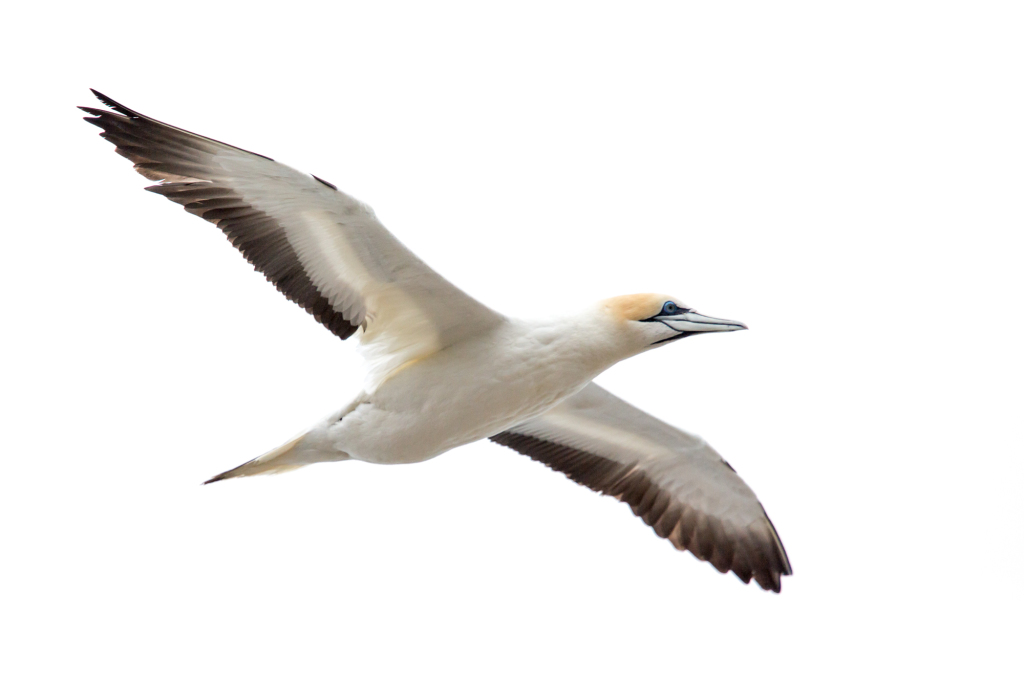
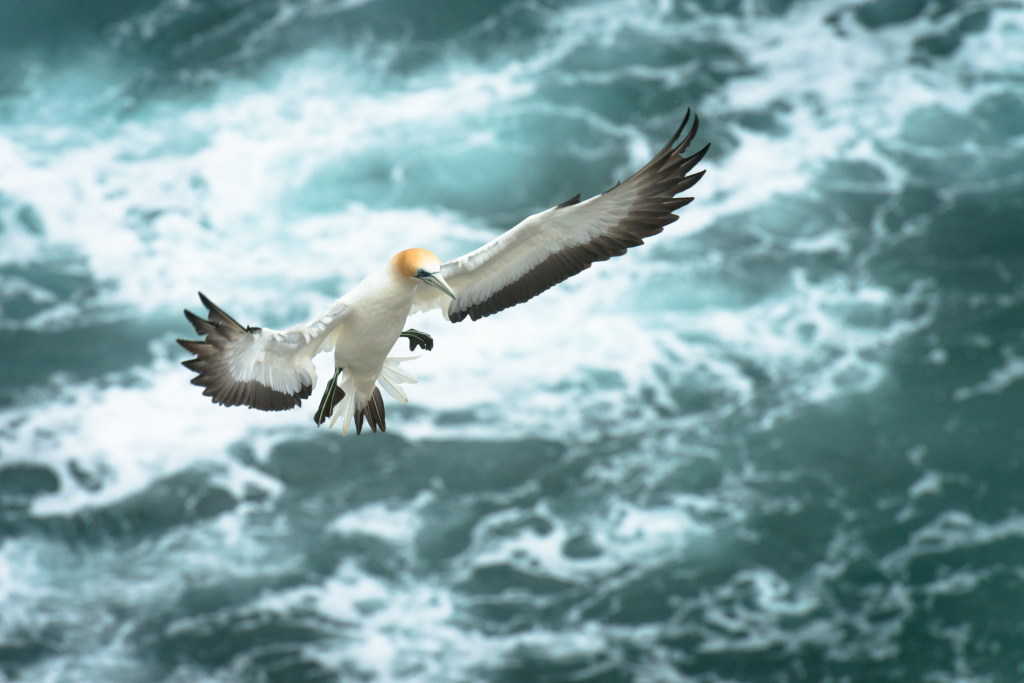
The birds are constantly coming and going, and in this case flying past the view point sometimes as close to 5 or 6 feet. These birds aren’t particularly shy, probably due to the sheer number of visitors on a daily basis. Conditions on the day we visited were overcast and rainy and we still saw close to 40 people.
Gannets mate for life and come back to the same spot year after year to raise their young. When the young gannets get large enough to fly, they head to Australia where they tool around for a couple years before returning to the colony to find a mate, secure a nesting spot, and rear their own young. Parents take turns with the chicks, and when a mate returns the pair does what can only be described as a small reunion ceremony of head bobbing, beak tapping, and nodding.
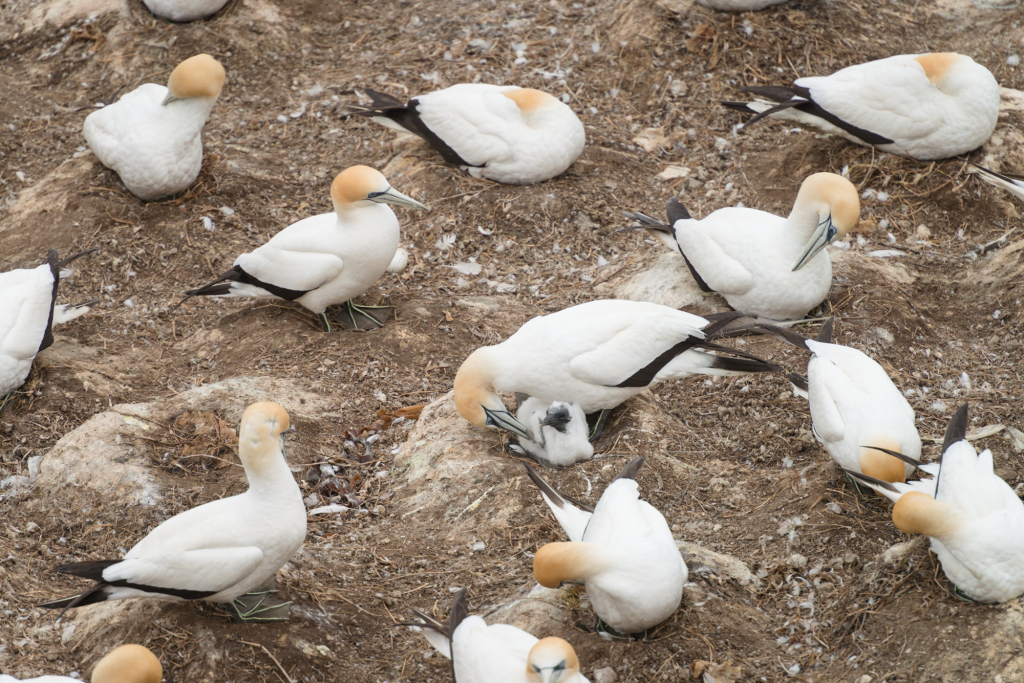
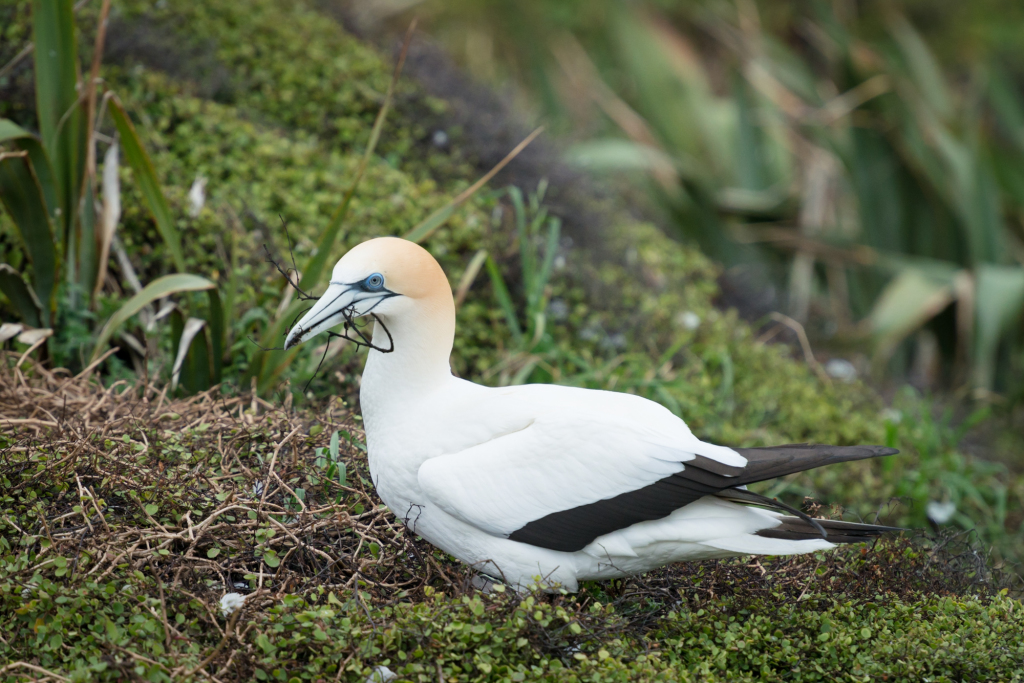
Most nesting pairs we saw had eggs, and a small number already had chicks. Others were gathering supplies for their soon to be nests.
Like albatross, gannets aren’t very well coordinated on land. On more than several occasions, birds taking off flopped through other nesting birds, receiving pecks along the way until they could throw themselves off the side of the cliff and take flight. Landing was slightly more graceful with birds landing almost directly atop their nests. Gannets at the edge of the cliff must have held prized nesting spots because these were easy to both land and take off from.
It’s hard not to be captivated by these birds. Their yellow head with blue eyes make for a striking image. One particular gannet landed quite close to the viewing platform and proceeded to preen itself for 15-20 minutes, frequently looking at us with those dramatic blue eyes.
(photo by Anne Archambault)
Oct
11
2014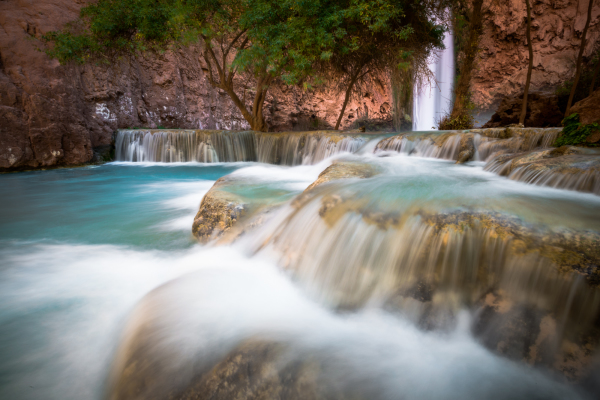
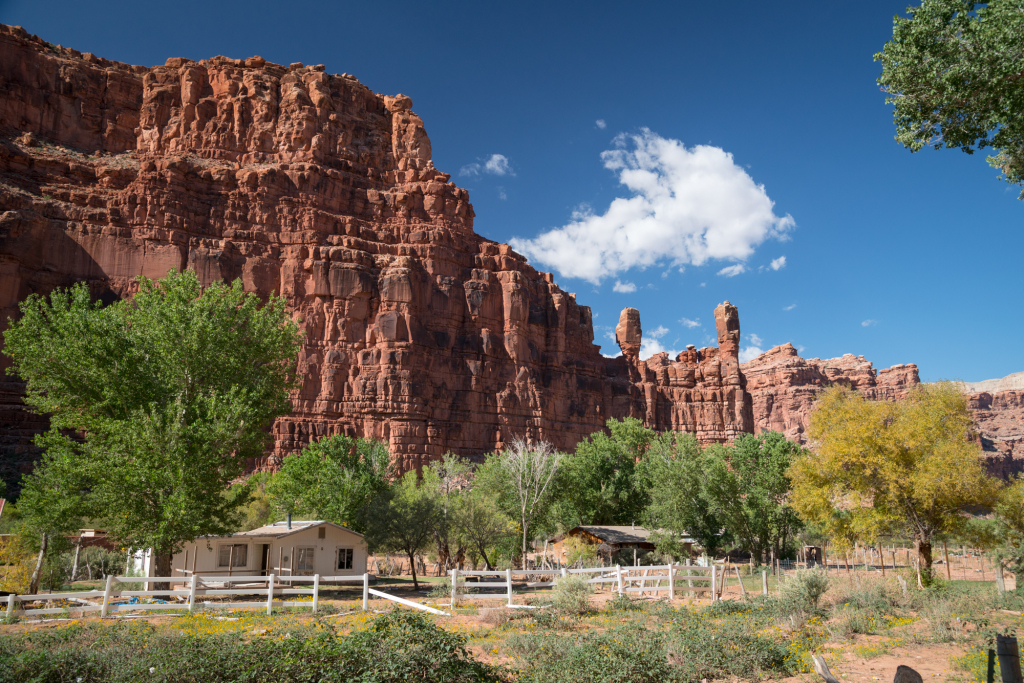
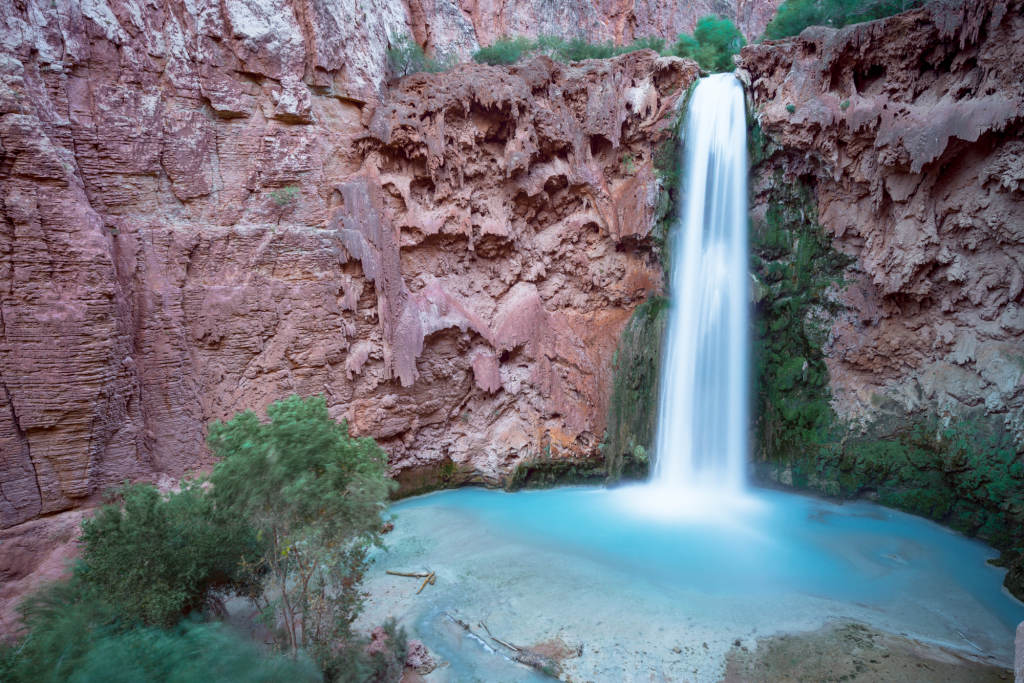
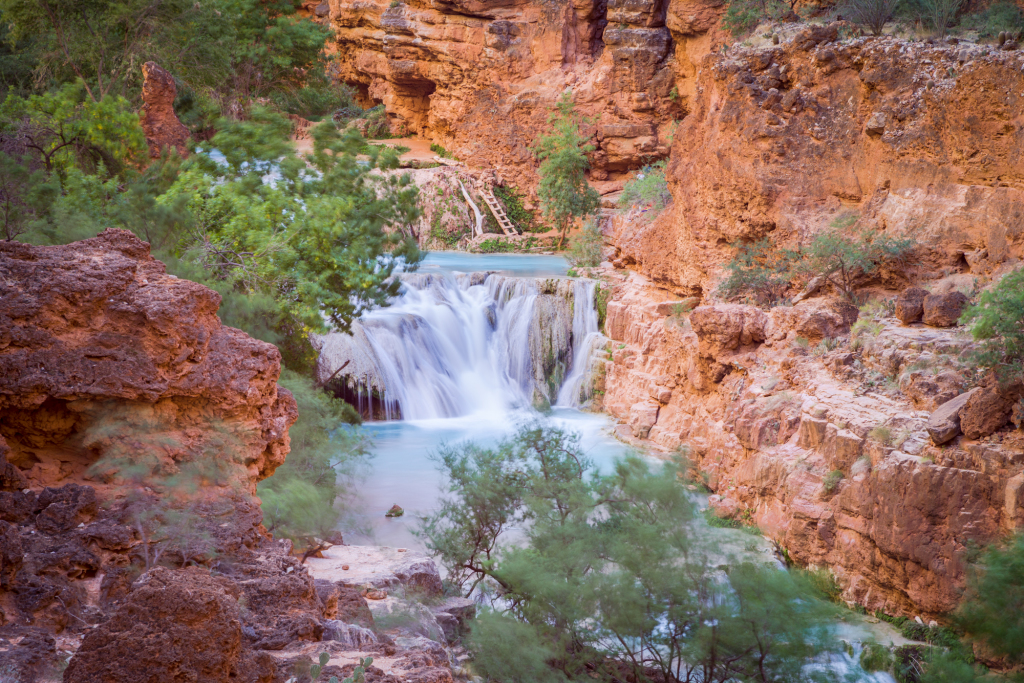
Anne was in Phoenix attending the Grace Hopper conference and so we made plans with our friend Valerie (of Haute Route fame) to hike into Havasu Falls and the Havasu creek canyon. Havasu creek is somewhat unique because of the high mineral content in the water, giving it an astounding turquoise color and building up beautiful travertine pools that provide for countless smaller cascades down the length of the canyon. The beauty of the canyon certainly puts it on the “bucket list” of hiking and photographic locations to visit. So Anne and I were both super excited, both because we got to spent time with Valerie as well as because we got to do it in such a wonderful location.
Camping reservations into the canyon are notoriously difficult to get given the popularity of the hike. However, Valerie was doggedly persistent and able to secure camping reservations by calling repeatedly until a camping space finally opened up.
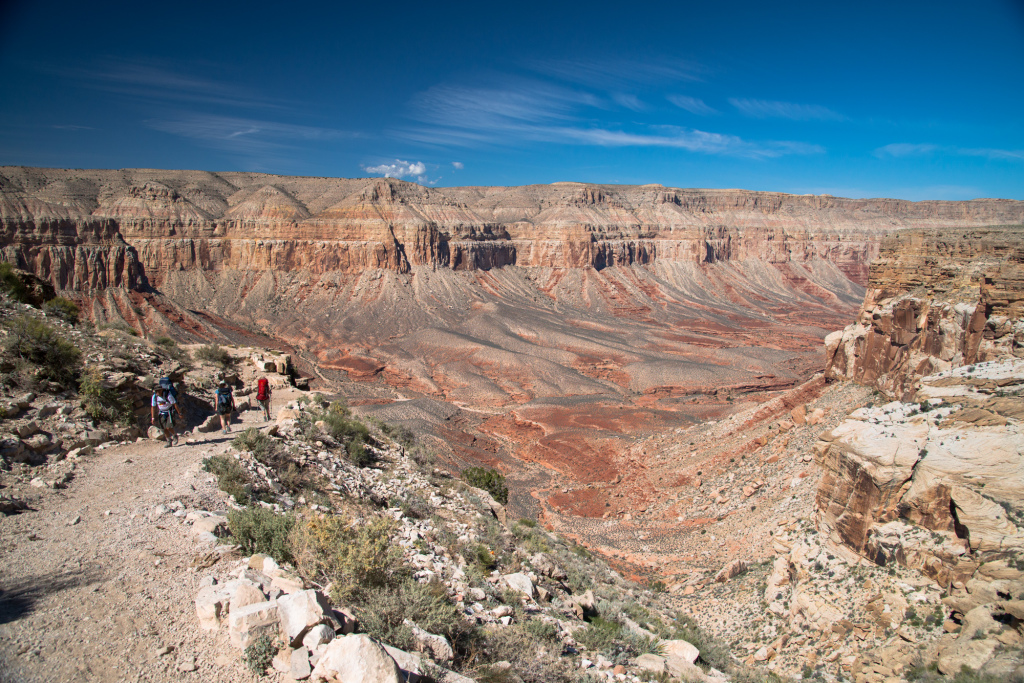
On paper, the hike is not a difficult one. From the trailhead to the campground my GPS clocked 10.75 miles with 2577 feet of elevation loss. However, the statistics don’t take into account the fact that most of the trail follows a river wash with a packed gravel surface. This provides a good path, but saps energy and makes the hike feel longer than it might on a firmer packed surface.
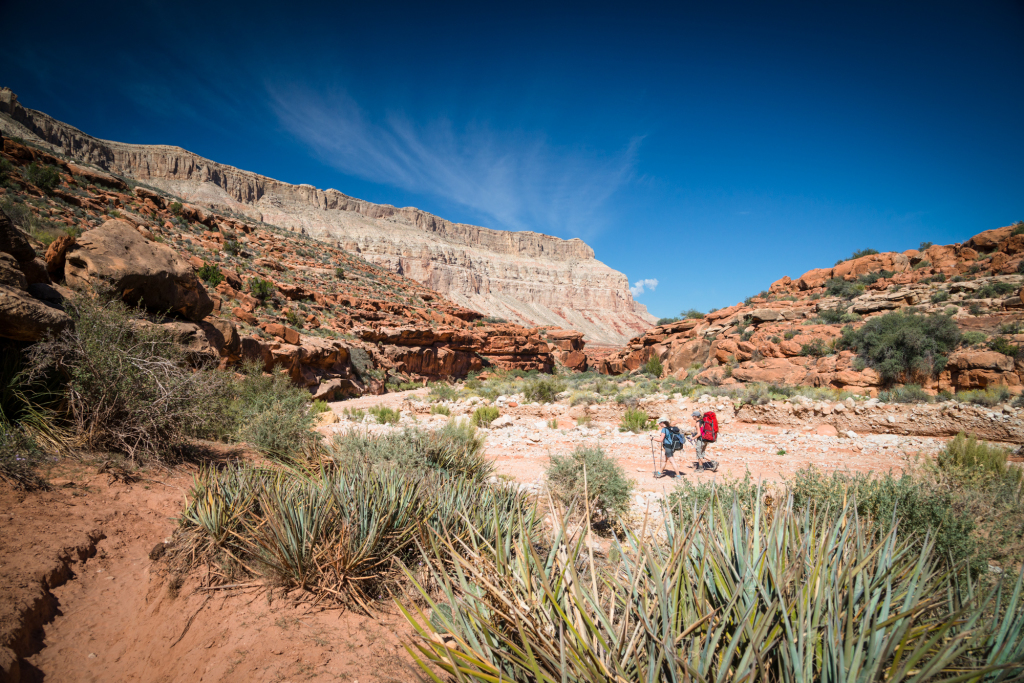
We started our hike on Saturday morning and arrived at the trailhead around 11:00 am after a relatively leisurely breakfast in Peach Springs. By that time the parking lot was already packed to overflowing, with cars parked well down the road. We rounded ourselves up for the hike quickly and set out on the hike right around 11:30 am . Luckily, the temperatures were still mild and made for a pleasant start.
The hike drops elevation quickly as it makes its way down a series of switchbacks that joins a gentle ridge taking you down into the bottom of the canyon to the creek bed. This trail then winds its way very gently downhill, following a river bed to the town of Supai.
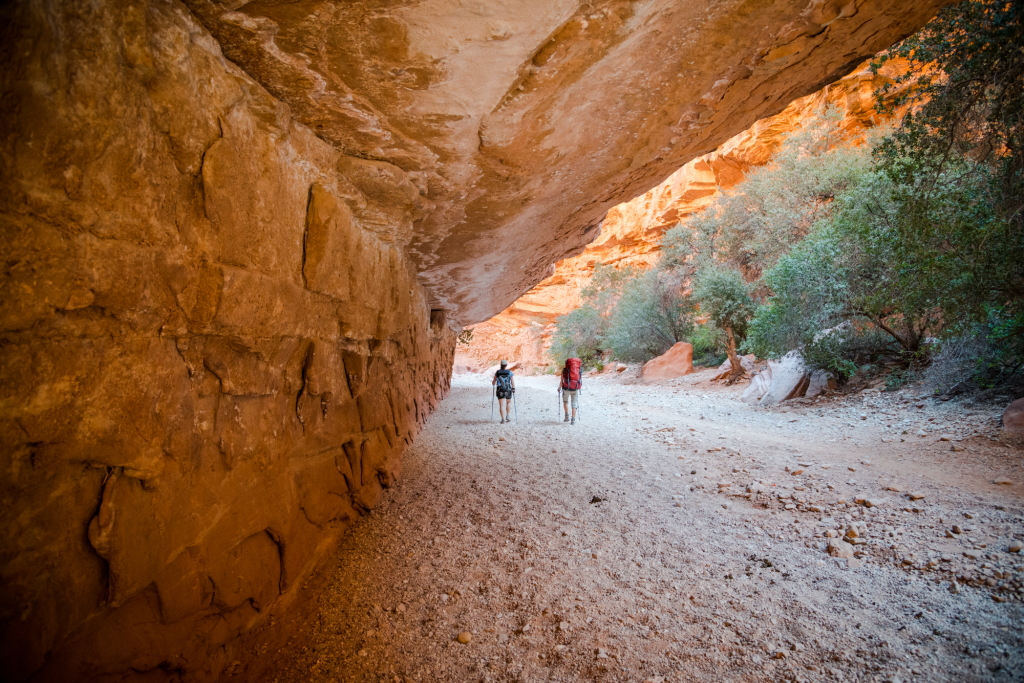
Along the dry creek bed, there are often braided trails that shortcut horseshoes in the creek and help facilitate both horse and human traffic. Plenty of horse droppings help confirm continually that you’re on the right track. Surprisingly, given our late start, the hike was a pleasant one with long sections of the trail being in partial shade. After about 3 hours, we reached a junction with a sign confirming that we were “almost” at Supai. The trail forked left and continued through a dense patch of trees where we first crossed Supai creek. Shortly thereafter we descended a small hill and arrived at the village of Supai. We wound our way around town and stopped at the Camp Reservations building (about 7.4 miles from the trailhead) where we picked up our camping permits consisting of printed wrist bands for each member of the party as well as a tent tag for each tent in the group.
Note to hikers: There is a water spigot at this building where you can fill your water bottles.
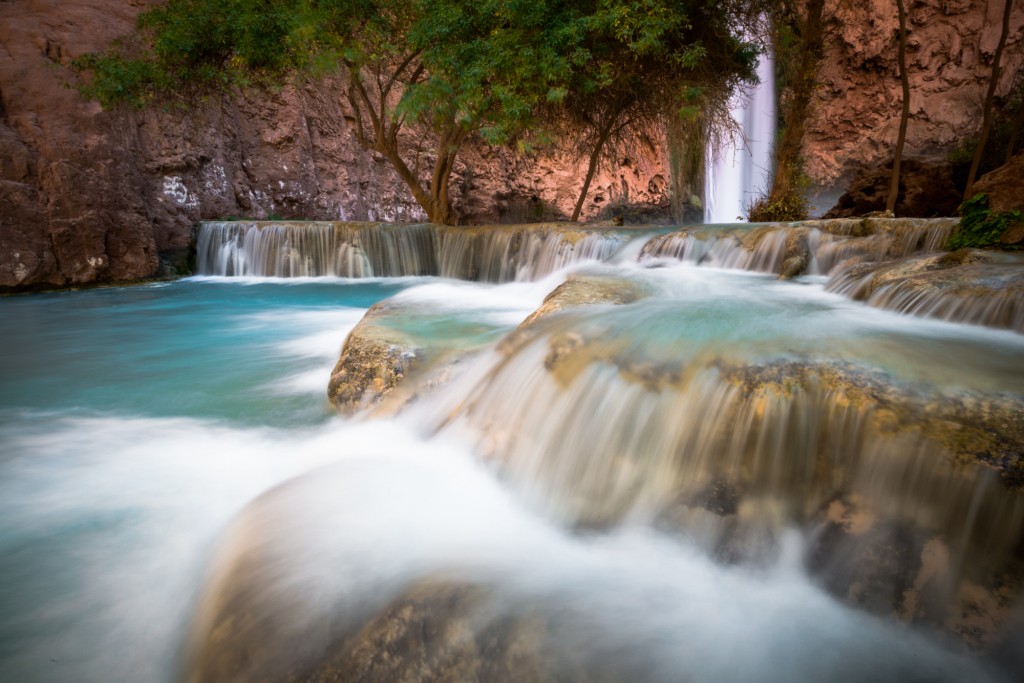
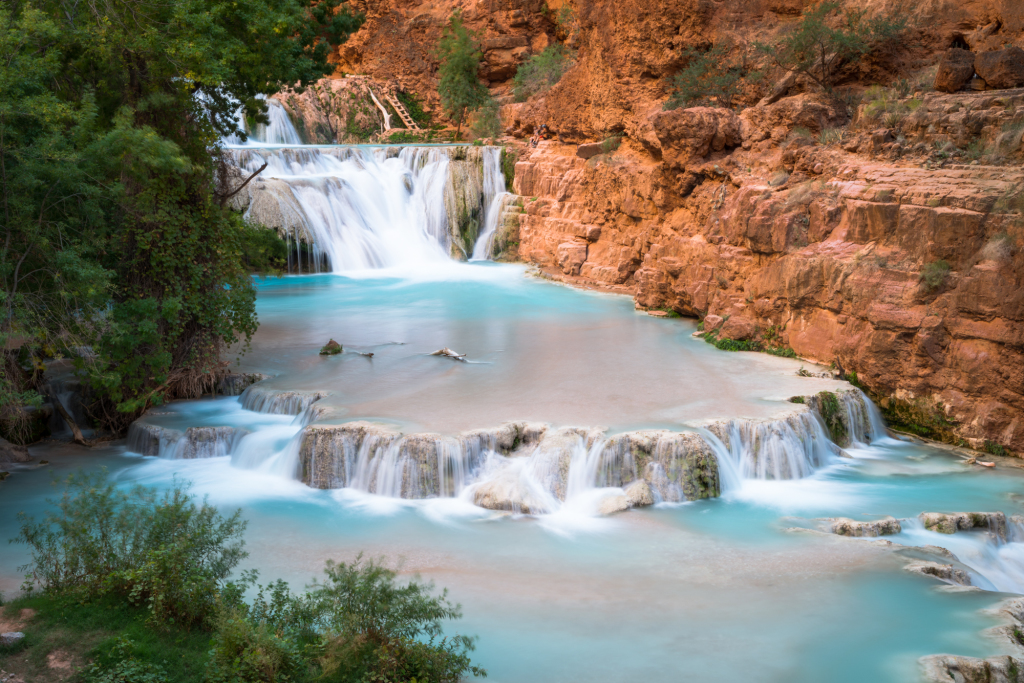
The trail leads quickly out of town to parallel Havasu Creek, which then again quickly brings you to your first set of small but beautiful travertine cascades.
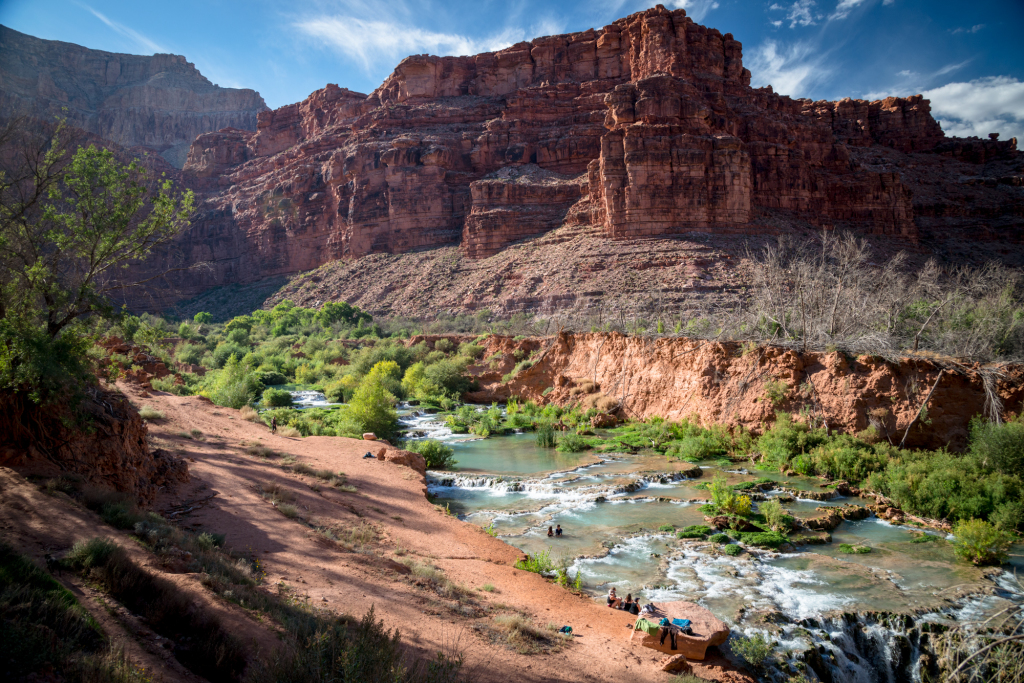
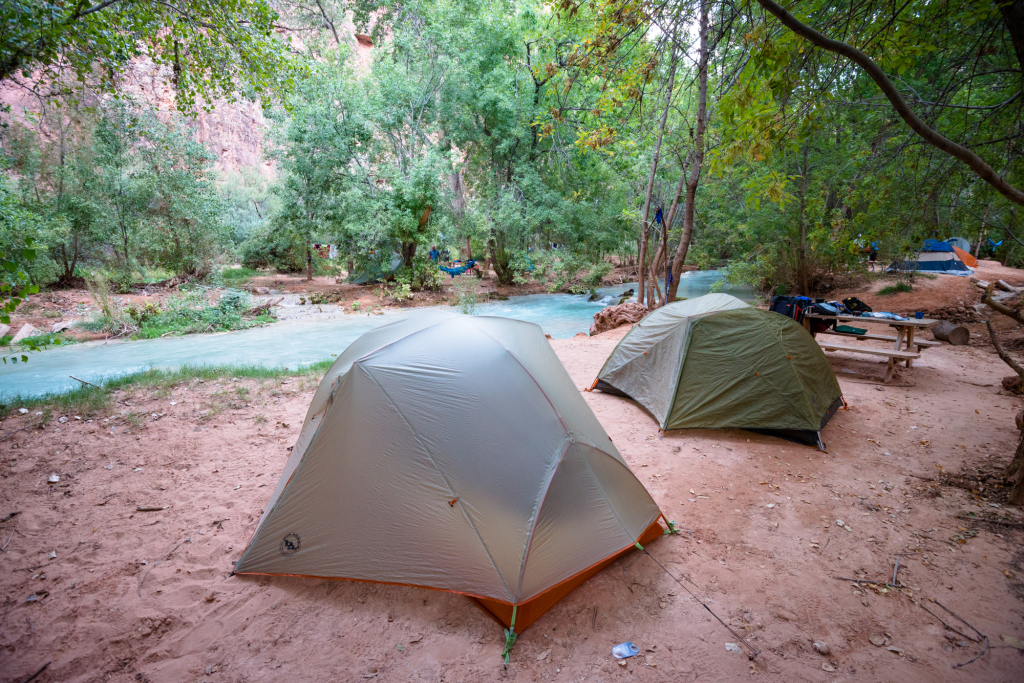
Not far beyond is Havasu Falls and the campground. We’d read about the campsite before we left and steered past the start of the campground, instead looking for sites after about the second bathroom. However, the campground was almost completely full with people which made campsite selection difficult. In the end, we wound up with an excellent, secluded spot next to the creek at the very far end of the camp group (close to Mooney Falls). Total time, about 5 hours.
On Sunday we hiked further down the canyon with the desire to photograph Beaver Falls. Just beyond our campsite was Mooney Falls, maybe a 5 minute walk from the end of the camp group. Here the trail winds down a series of increasingly steep ledges until it finally disappears into a hole in the rock that passes through a tunnel and to a series of chains and ladders that descend to the base of Mooney Falls.
The lower section of the descent is perpetually wet from the spray off the cascade making for both muddy and slippery conditions. It’s not a particularly difficult descent, but does require care and is best done without others either coming down on top of you or climbing up immediately under you.
Mooney Falls and pools offer some really nice photographic opportunities. On the far side of the canyon from the ladders there are a nice set of travertine cascades that contrast beautifully against the red canyon walls. Get here early or late to avoid harsh sunlight.
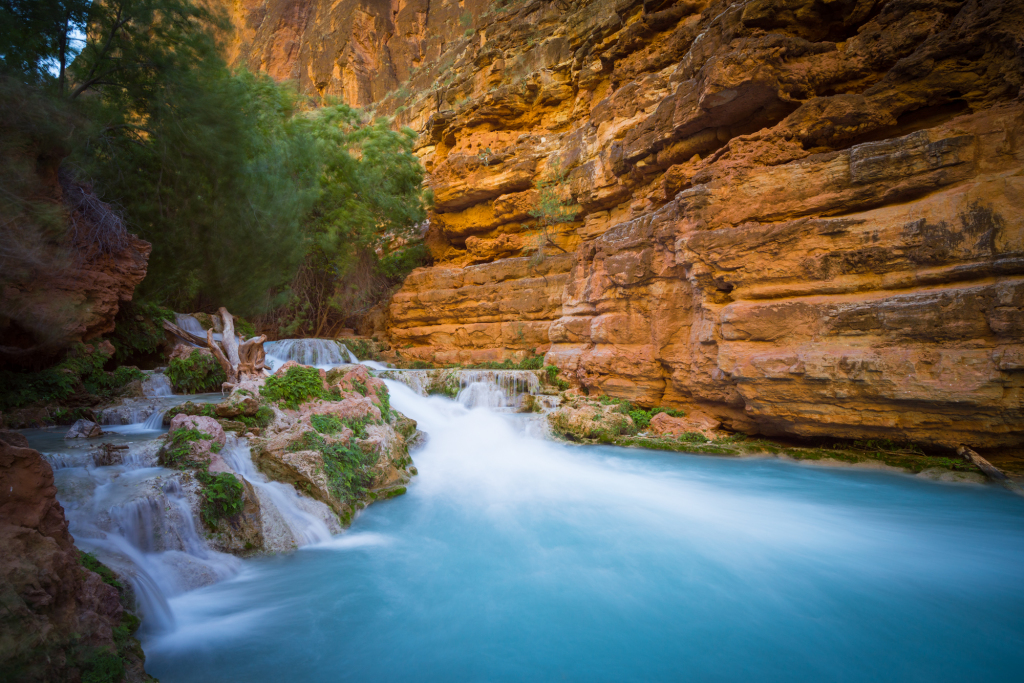
Continuing further down the canyon brings you to two creek crossings. Here you’ll need to remove shoes (or be willing to get them wet) before you can continue dry the rest of the way to Beaver Falls. Havasu Creek continues down the valley with ever present pools and falls, all robed in the beautiful blue-green hues that makes it stand out so vividly against the red rocks.
In a couple places, you ascent ladders or hewn logs to gain high trails that look down on the winding creek before finally ending at a tribal patrol station where your wrist band is checked. Before descending to the creek, you can make a short (~100 yard) detour to step inside Grand Canyon National Park and look back at Beaver Falls from a nice vantage point. It’s possible to continue another approximately 4 miles to the Colorado River.
The hike to Beaver Falls concludes with a descent down a series of three ladders where you cross Havasu Creek just under the falls. The river crossing below Beaver Falls is quite shallow and allows for easy placement of a tripod to get nice long exposure images of the falls and pool.
Notice to hikers, as we were ascending out of the falls I was hit in the head by a small rock falling from above. Thankfully, it left me with only a little pain but the consequences of such a hit could have been fatal. From that point on, I made a point of standing well clear of the canyon walls when I was able to.

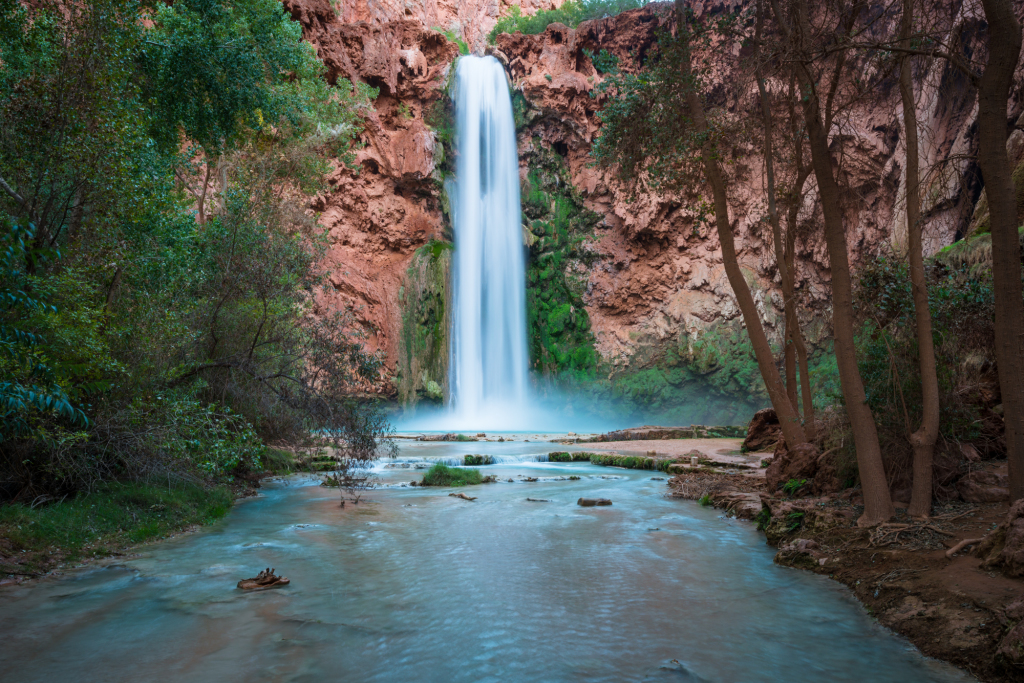
We finished the day by hiking back to camp and up to Havasu Falls to catch sundown. Havasu Falls are best photographed in the early morning or late evening to avoid harsh sunlight and high contrast. As an added advantage, by the time we got there most of the day hikers and swimmers had left.
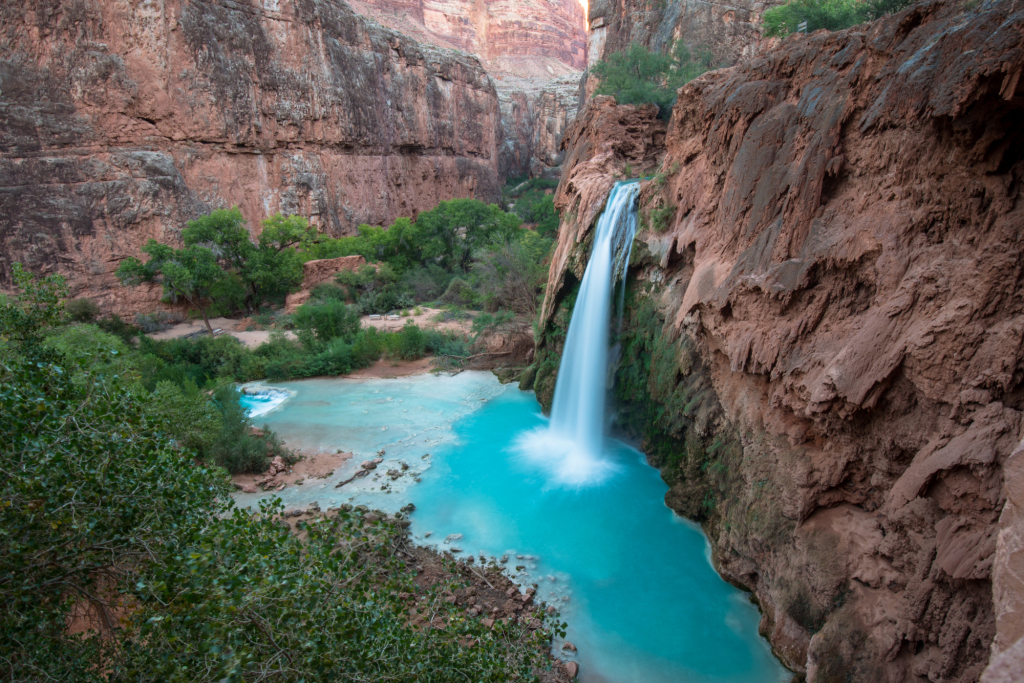
Because we had a 6pm flight out of Phoenix, we had to get a really early start on Monday morning. We woke at 4am, packed up camp, and were on the trail by 5am under bright moonlight and an incredible blanket of stars. Havasu Falls was well lit by the moon as we walked past, making for a magical scene. By the time the first sunlight was hitting the rim of the canyon we’d already passed Supai and were on our way up the wash. Because of the early start, we enjoyed cool temperatures and shade for all but about the last 30 minutes of the hike, and only about 15 minutes worth of that was in direct sunlight.
We ended the hike with sore feet and big smiles, excited about both the amazing sights in the canyon and the great companionship we shared over the weekend. Definitely a bucket lister!
Total distance: 10.89 mi
Max elevation: 5236 ft
Min elevation: 2585 ft
Max elevation: 5236 ft
Min elevation: 2585 ft
Sep
14
2014Anne and I headed out of work as quickly as we could Friday to try and make the best out of one of the best aurora forecasts (see my other post on photographing the Aurora Borealis) in a long time. As we left Redmond, the estimated planetary Kp index was already topping 7, promising strong aurora displays overhead. Our destination, Mt. Baker. We knew that we could hit Artists Point by car, which would give us both high elevation as well as unobstructed views and dark skies.
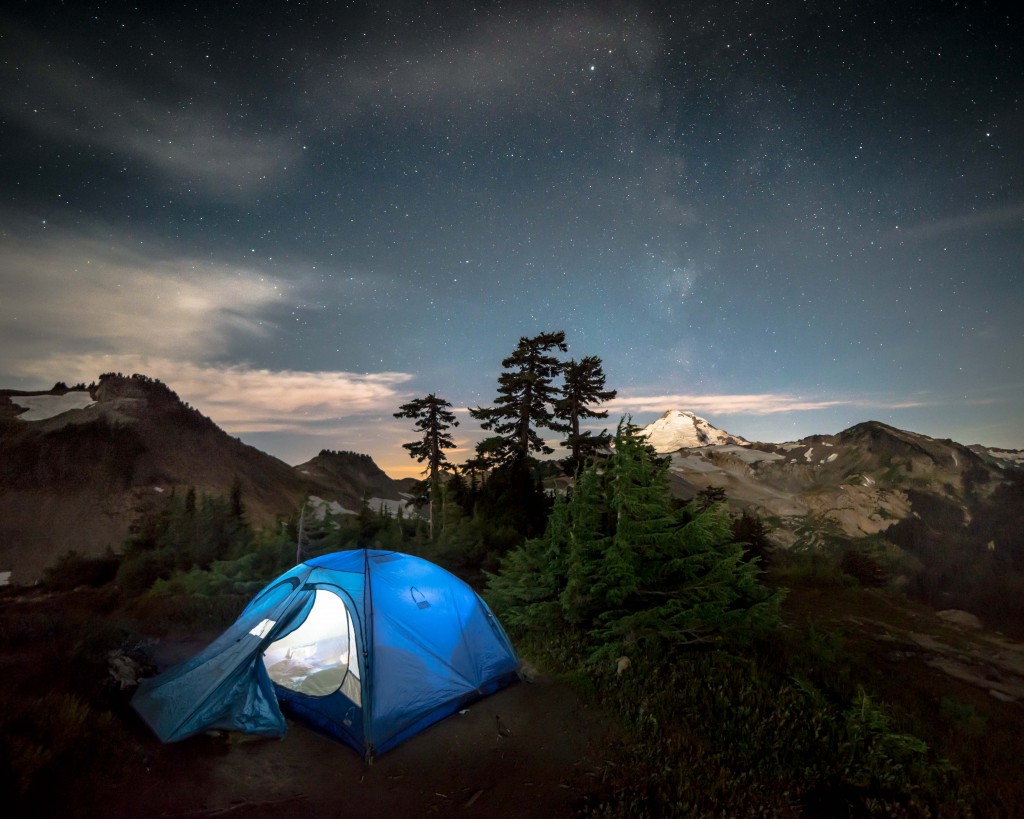
While we’d hoped to grab a campsite in either Douglas Fir or Silver Fir campgrounds, we found quickly that we were out of luck and that all camp sites were full. Undaunted, we continued to the top of the Mt Baker Highway to the Artists Point parking area where we found a party like atmosphere. The parking lot was full, the camper behind us had a fire pit going, and music was playing loudly. In 360 degrees around us, people had taken up residence on virtually every promontory and cars were coming and going by the minute.
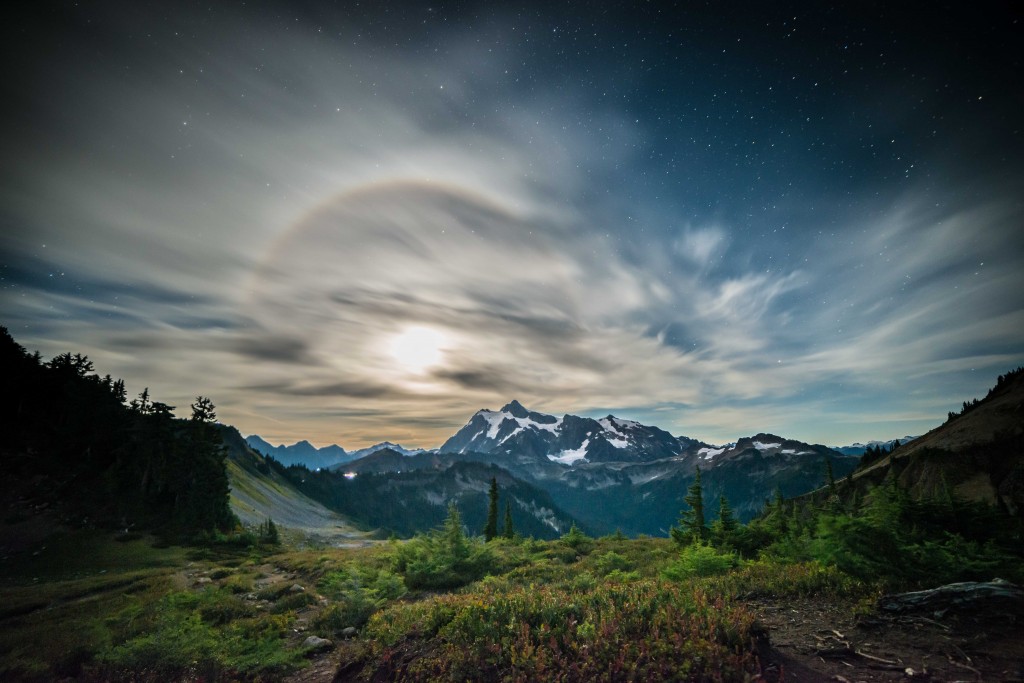
Anne and I quickly decided that in order to both have the best chance of catching the aurora as well as sleeping for the night, we’d be best to backpack out past Table Mountain and grab a campsite where we would be away from the crowds and have a place to sleep. We packed up our car camping tent, cameras, clothes, minimal food, and tripods and left as quickly as we could. The 1.1 miles to the Chain Lakes/Ptarmigan Ridge junction passed quickly and under glorious conditions and we found ourselves a camp site overlooking the chain lakes, Mt. Baker, Mt. Skuksan, and the rest of the splendor of the Mt. Baker wilderness.
We made camp and stayed up till midnight, but no aurora presented itself. Just to make sure, I left my camera out overnight to capture a time lapse, which also proved that the aurora was not to be found. Regardless, we had an absolutely wonderful night out under the stars in some of the most spectacular landscape one could wish for.
Aug
17
2014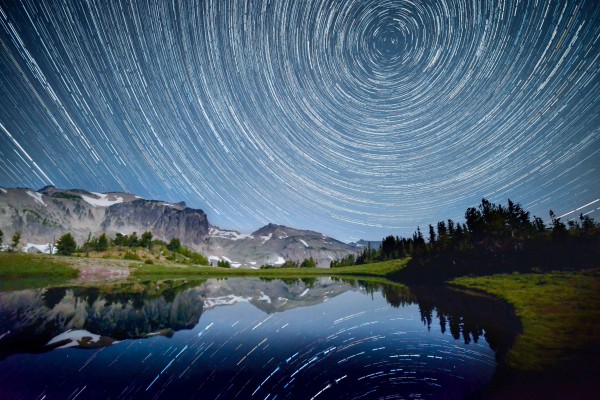
Mt. Curtis Gilbert (8184 ft) in the Goat Rocks Wilderness has been on Anne’s and my climb list for a while. Given that we hadn’t been on an overnight backpacking trip since our Zion Narrows trip and that the forecast looked promising, we decided to give it a go. Peggy Goldman’s Washington Scrambles book listed the hike’s coordinates as relatively moderate with an 8 mile/2000ft approach to Warm Lake and another 4 miles/2000ft to gain the summit. We loaded up our packs Friday night and set out early on Saturday morning for the trailhead.
For a little good karma, we picked up a hitchhiker at the Stevens Canyon Road / Highway 123 junction. This hiker turned out to be a PCT through hiker who was going for a resupply in Packwood. The amazing part – this hiker and his wife had already completed the PCT from Mexico to Canada and were headed back to the Mexico border! So even though it was a little out of our way, we enjoyed the company so much we eagerly drove him to Packwood. Sadly, we never thought to get either his name or email address. [UPDATE: It turns out our PCT through hiker’s name was Darrell “Chimp” Johnson and he unfortunately wasn’t able to complete his yoyo PCT hike because of injury. His wife, Dubliner Olive “Raindance” McGloin, ended up completing her yoyo PCT trek by herself thereby becoming the first women to do so. That’s an average of 27 miles a day for 195 days straight! What an outstanding achievement!]
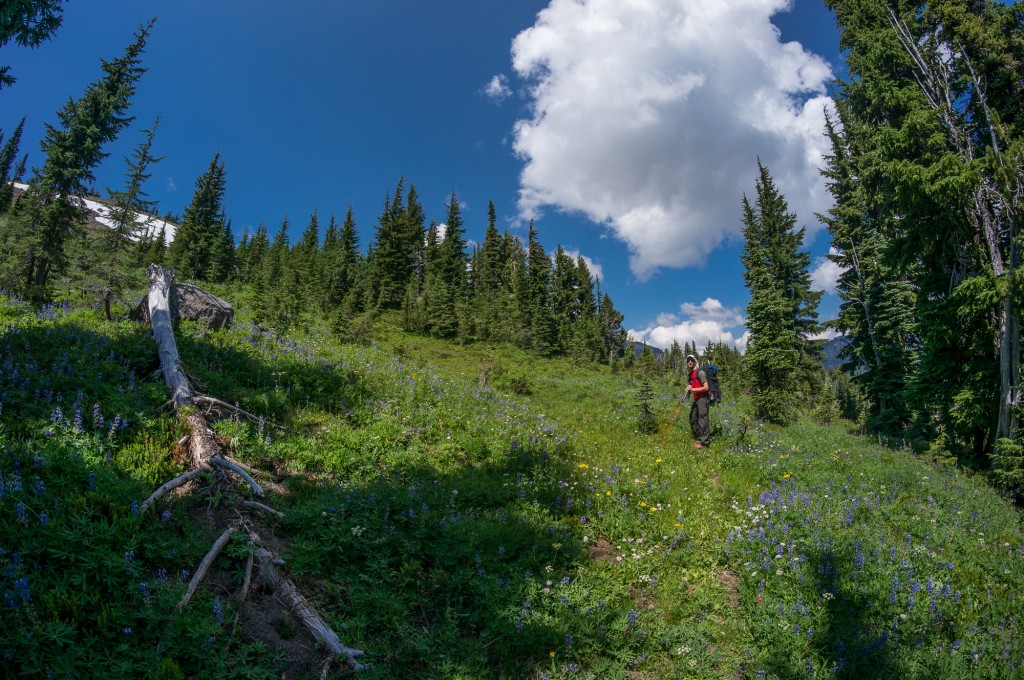
We arrived at the trailhead around 12h30, ate a quick lunch, and set off across Conrad Meadows towards the Surprise Lake Trail. Conrad Meadows is the largest subalpine meadows in the Cascades. Despite trip reports of hikers getting lost by the myriad paths leading across Conrad Meadows, Anne and I (with the help of GPS) were able to chart a straight path to the official start of the trail and the permit box.
The hike was very moderate and the trail was both well-maintained (despite the heavy horse traffic) and very well graded. In fact, it seemed that we barely gained elevation at all. Anne and I took the “Old” trail that was called out in the new version of Peggy Goldman’s Washington scramble book. This in opposition to the “New” trail leading to Surprise Lake in the old version of her book.
(Photo by Anne Archambault)
However, the pleasant grade changed abruptly once we reached the turn off towards Warm Lake. The path towards Warm Lake is marked by a cairn and a small path leading to the north that gains elevation steeply as it climbs away from the main Surprise Loop trail. The trail continues to gain elevation and travels (counter-intuitively) AWAY from Warm Lake until it gains a small plateau under a steep, somewhat cliffy hillside. The path continues away from Warm Lake, over the South Fork Tieton tributary, until it ascends steeply again making for a small col from which you turn left at the cairn and travel back towards Warm Lake following what could best be described as a game trail. You’ll again from the South Fork Tieton where the trail completely disappears and you continue overland up the hillside to reach Warm Lake.
(Photo by Anne Archambault)
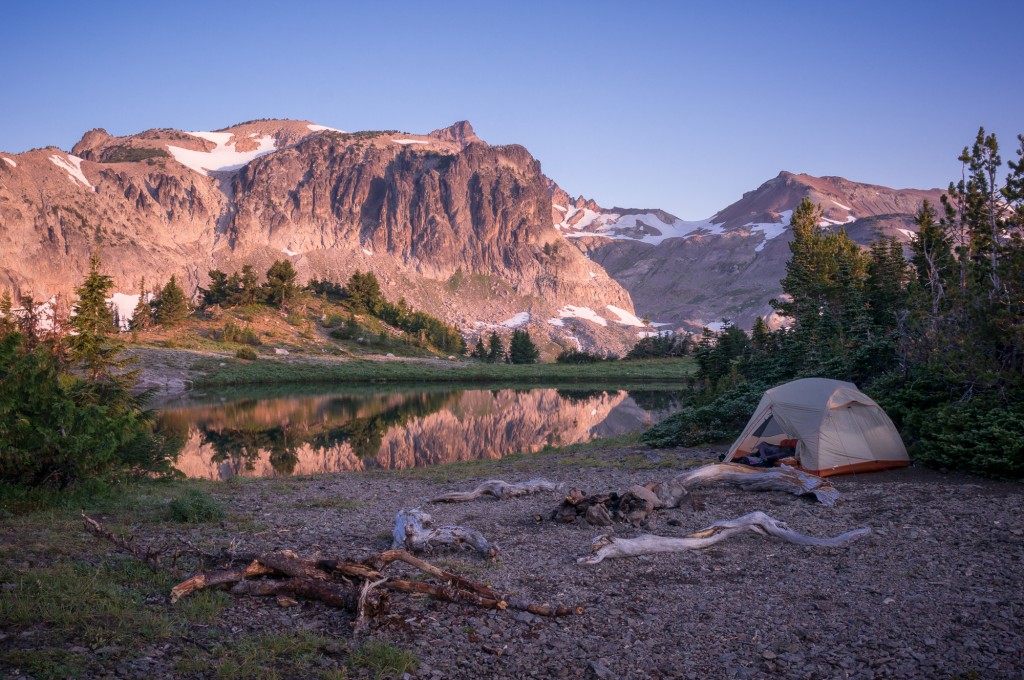
We had a grand campsite at Warm Lake that was well secluded, close to water, and afforded an excellent view of the cirque, the ridge, and our next morning’s summit. We ate well, rested our feet, and found a spot to hang our food for the night. In addition to the normal camp chores, we’d also brought a tripod and digital cameras, intent on doing some night photography and time lapse. The moon was set to rise around 11h30PM so I woke up around 10:30PM to set up my camera and leave it running for the rest of the night.
I was a little worried that my all night experiments might not have produced anything. In the end, I think the results are pretty cool and I was happy to work a little at my video editing skills.
Our climb the next day took around 4 hours return to the summit. The trail was a faint and rarely used goat path that followed the obvious ridge to the shoulder of Gilbert.
(Photo by Anne Archambault)
This leads to an obvious traverse on the west side of the buttress to a point of weakness in the small but vertical bands of rock. The true summit was attained by heading nearly straight up. On the way up, we met another couple who had been leapfrogging us since we left the trailhead the previous day. They were Mazamas from Portland (Jonathan and Sandy) out for a weekend. We shared the final scramble to the summit, being careful to avoid rock fall as we made our way up the loose slope.
On the summit the views were grand as the Goat Rocks Wilderness was laid out before us along with Mt. Adams, Mt. St. Helens, and Mt. Rainier. We had Jonathan and Sandee take a picture of us rather than our generally mandatory selfie and then made our way back towards camp.
The trip out was uneventful even if it was long, dusty and hot. We stopped to refill our water bottles several times along the way and were glad for the various opportunities to grab fresh (and cold) water. By the time we reached the car around 5pm I was footsore and ready to devour a juicy burger.
(Photo by Anne Archambault)
Total distance: 23.95 mi
Max elevation: 8191 ft
Min elevation: 3880 ft